
Software Guide
MT Auto Clicker Windows / Mac Guide
Step-by-step setup instructions for every automation feature in the MT Auto Clicker desktop app.
Feature 1 of 8
Single Target Clicking
Automates clicks at one location on your screen. It's the fastest way to set up repetitive clicking.
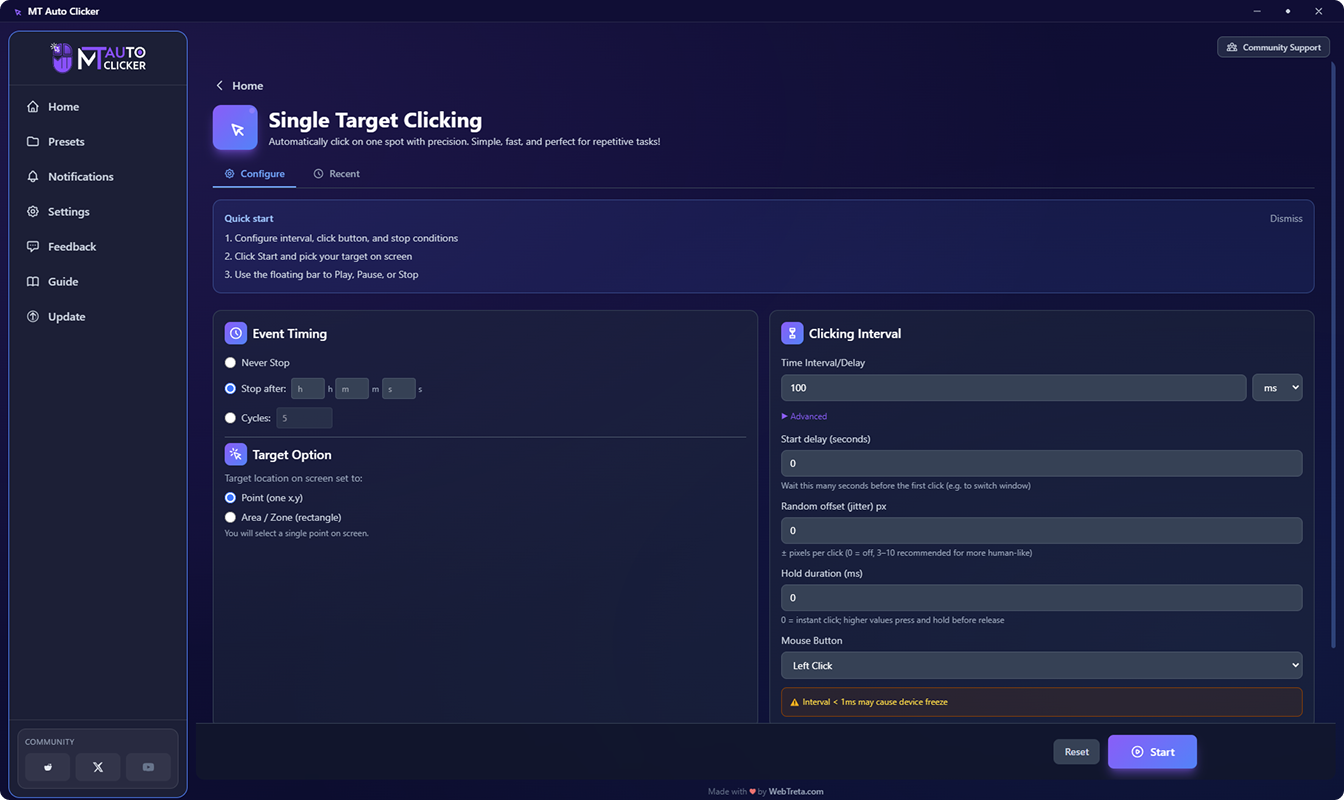
Step 1: Open Single Target Clicking
From the Home screen, click the Single Target Clicking tile. The setup screen shows a Quick start summary tooltip you can reference anytime. Two tabs sit above it: Configure, where you set everything up, and Recent, where you can review or reuse settings from a past run.
Step 2: Set Event Timing (left column)
Choose how long the clicking should run:
Never Stop
clicking continues until you stop it manually
Stop after
enter hours, minutes, and seconds in the separate h / m / s fields
Cycles
enter the exact number of clicks you want
Step 3: Choose a Target Option (left column)
Pick how MT Auto Clicker should target your click:
Point (one x,y)
click a single fixed spot on screen
Area / Zone (rectangle)
click at a random position inside a rectangle you draw, useful when you want clicks to land slightly differently each time
Step 4: Set the Clicking Interval (right column)
Enter the delay between clicks and pick a unit from the dropdown (milliseconds by default).
- 1000 ms equals 1 click per second
- 100 ms equals 10 clicks per second
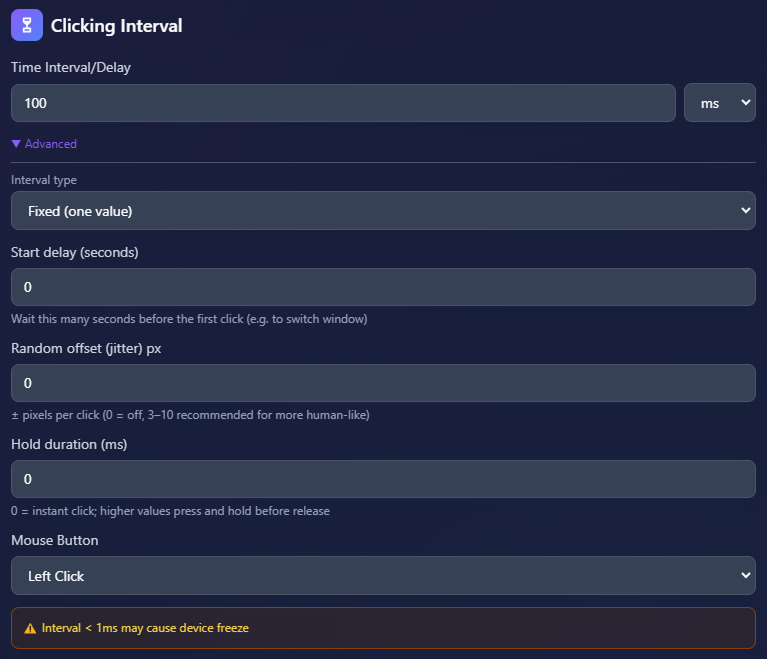
Step 5: Fine-Tune with Advanced Settings (Optional)
Click Advanced for one more option, Interval type, added above the fields already showing:
Interval type: choose Fixed (one value) to click at the exact interval you set in Step 4, or Random range (min-max) to have MT Auto Clicker vary the delay between clicks within a range you define, useful when a perfectly even rhythm looks suspicious. This is different from jitter below: interval type randomizes the timing between clicks, while jitter randomizes the click position.
Start delay (seconds): wait before the first click begins, useful for switching to the target window first
Random offset / jitter (px): adds a small random pixel variation to each click position. Set 0 to disable, or 3 to 10 px for a more human-like pattern
Hold duration (ms): 0 performs an instant click; higher values press and hold before releasing
Mouse Button: choose which button to simulate (Left Click by default)

Step 6: Click Start
Click Start at the bottom of the screen. This doesn't begin clicking right away. Instead, the floating MT Control Bar appears on your screen, ready for you to set your target position.
Use Reset at any point before starting to clear your configuration and start over.

Step 7: Use the MT Control Bar
The MT Control Bar is a compact vertical toolbar that stays on top of your screen. You'll use it out of order: set your target first, then press Play. From top to bottom, the buttons are:
Play: starts or resumes clicking. Use this last, after your target is set.
Save: saves your current configuration as a preset for later use
Eye icon: hides or shows the target marker on screen
Center icon: compacts or expands the control bar. It's highlighted by default, but it does not activate the pointer, that's a separate button below it.
Plus icon: activates the pointer so you can click and set (or reset) your target position on screen. If you chose Area / Zone in Step 3, this lets you draw the rectangle instead. This is the button to click first.
Settings (gear icon): opens Feature Settings, where you can adjust the stop condition and clicking interval without closing the control bar
Close (X): stops the automation and closes the control bar
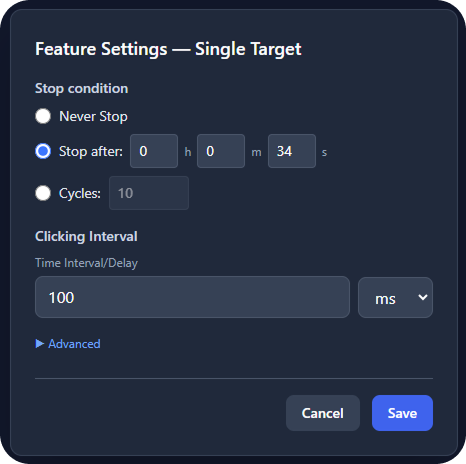
Step 8: Adjust Settings Without Restarting
Click the gear icon on the MT Control Bar to open Feature Settings. This lets you change the stop condition or clicking interval mid-session. Click Save to apply your changes, or Cancel to keep the automation running with your original settings.
Step 9: Stop the Automation
Click the X icon on the MT Control Bar to stop and close it, or press Ctrl + Shift + F9 / Cmd + Shift + F9 at any time to stop instantly from anywhere in the app.
Feature 2 of 8
Multi Target Clicking
Clicks on more than one spot on your screen, one after another. Built for tasks that need clicks at several different locations, not just one.
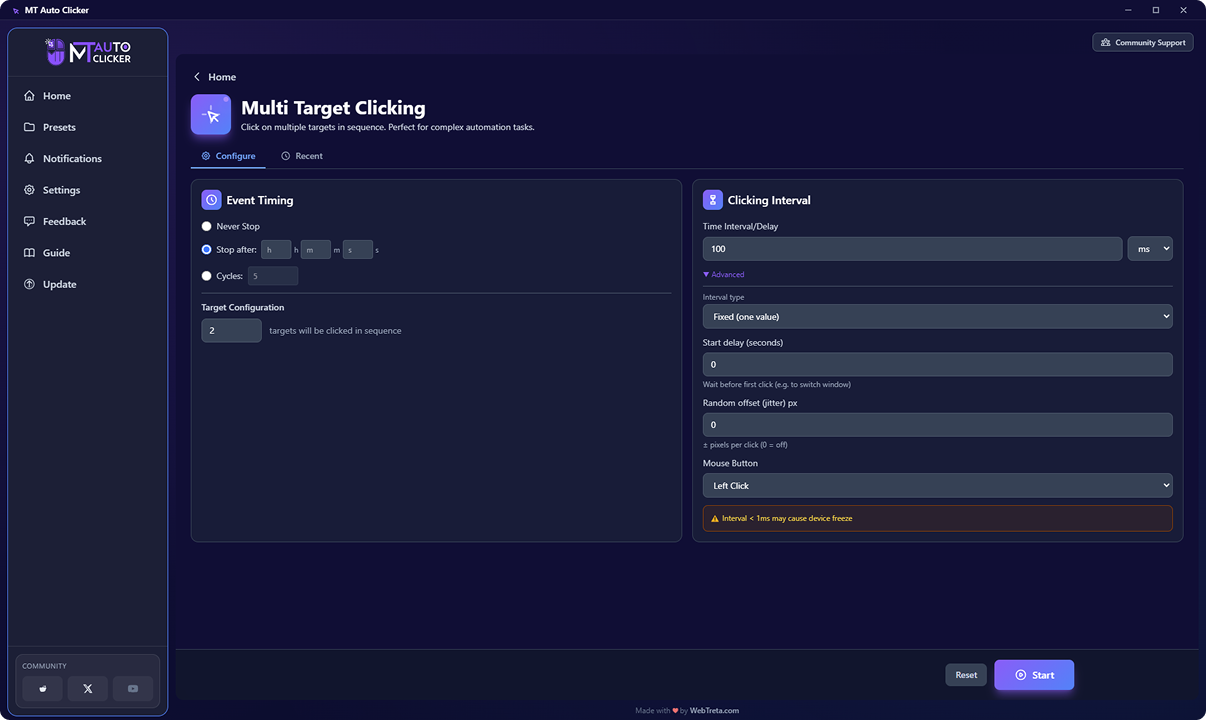
Step 1: Open Multi Target Clicking
From the Home screen, click the Multi Target Clicking tile. Two tabs sit above the setup screen: Configure, where you set everything up, and Recent, where you can review or reuse settings from a past run.
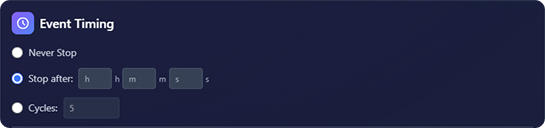
Step 2: Set Event Timing (left column)
Choose how long the clicking should run:
Never Stop
clicking continues until you stop it manually
Stop after
enter hours, minutes, and seconds in the separate h / m / s fields
Cycles
enter the exact number of times you want the full target sequence repeated
Step 3: Set Target Configuration (left column)
Enter the number of targets you plan to click in sequence. This number controls the order your clicks happen in once you add points in Step 6: the first targets you place, up to the number you enter here, always click in the fixed order you placed them (1, 2, 3, and so on). Any additional targets you add beyond that number still get clicked every cycle, but in random order among themselves.
For example, entering 3 and then placing 8 target points means targets 1, 2, and 3 click in that exact order every time, while targets 4 through 8 click in random order right after. Once a full pass through all targets finishes, MT Auto Clicker loops back to target 1 and repeats, continuing until your stop condition is met.
Step 4: Set the Clicking Interval (right column)
Enter the delay between clicks and pick a unit from the dropdown (milliseconds by default).
- 1000 ms equals 1 click per second
- 100 ms equals 10 clicks per second
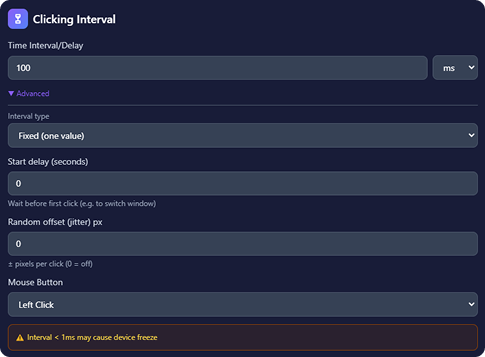
Step 5: Fine-Tune with Advanced Settings (Optional)
Click Advanced for one more option, Interval type, added above the fields already showing:
Interval type: choose Fixed (one value) to click at the exact interval you set in Step 4, or Random range (min-max) to have MT Auto Clicker vary the delay between clicks within a range you define, useful when a perfectly even rhythm looks suspicious. This is different from jitter below: interval type randomizes the timing between clicks, while jitter randomizes the click position.
Start delay (seconds): wait before the first click begins, useful for switching to the target window first
Random offset / jitter (px): adds a small random pixel variation to each click position. Set 0 to disable.
Mouse Button: choose which button to simulate (Left Click by default)
Multi Target Clicking doesn't include a Hold duration field, unlike Single Target Clicking.
Step 6: Click Start
Click Start at the bottom of the screen. This doesn't begin clicking right away. Instead, the floating MT Control Bar appears on your screen, ready for you to place your targets.
Use Reset at any point before starting to clear your configuration and start over.
Step 7: Use the MT Control Bar
Click the plus icon on the control bar to place a target point on screen, then click it again for each additional target. There's no limit to how many you can add. Place your points in the order you want the fixed sequence to follow, since the first points you place become the fixed part of the sequence from Step 3.
Once your targets are placed, click Play to begin clicking.
Step 8: Adjust Settings Without Restarting
Click the gear icon on the MT Control Bar to open Feature Settings. This lets you change the stop condition or clicking interval mid-session. Click Save to apply your changes, or Cancel to keep the automation running with your original settings.
Step 9: Stop the Automation
Click the X icon on the MT Control Bar to stop and close it, or press Ctrl + Shift + F9 / Cmd + Shift + F9 at any time to stop instantly from anywhere in the app.
Feature 3 of 8
Macro Recorder
Captures your mouse and keyboard actions as you perform them, then replays that exact sequence automatically. Built for multi-step tasks that don't fit a simple click pattern.
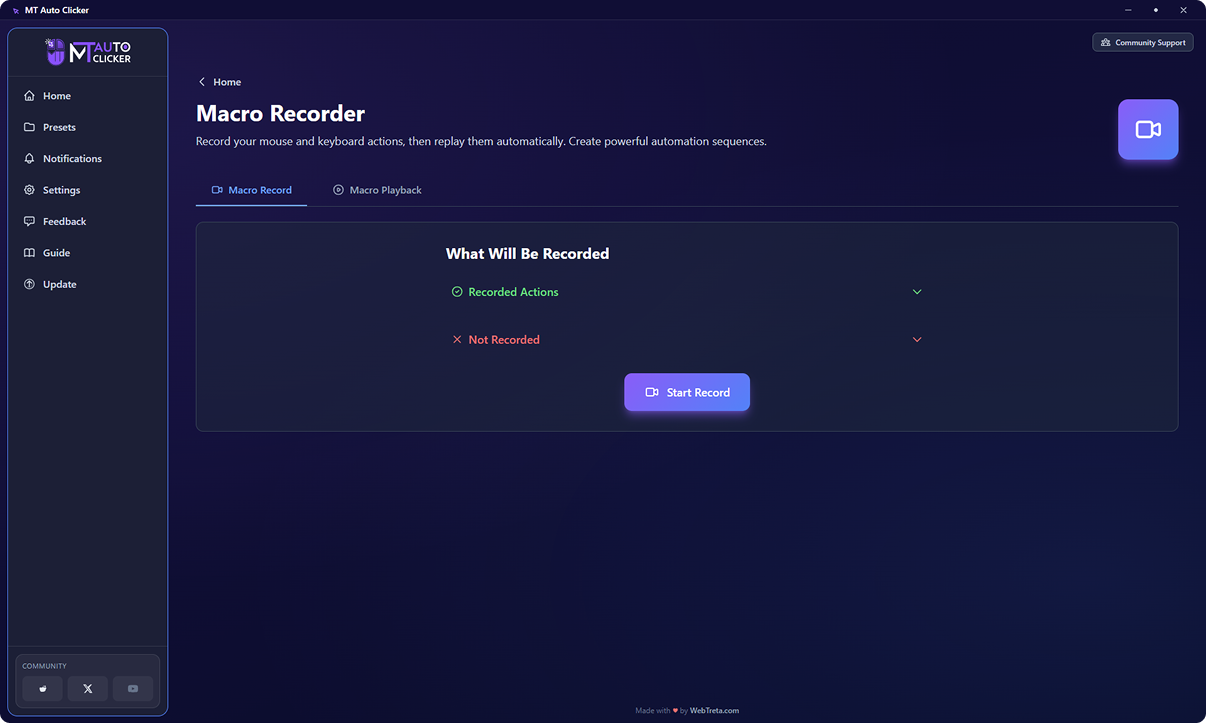
Step 1: Open Macro Recorder
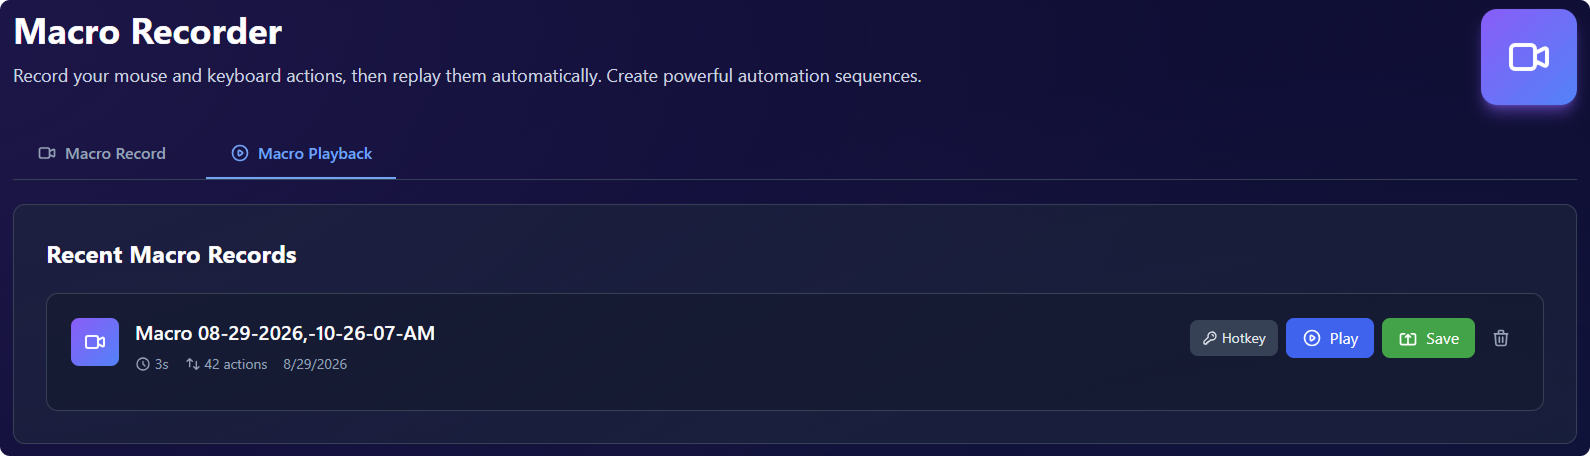
From the Home screen, click the Macro Recorder tile. Two tabs sit at the top: Macro Record, where you capture a new macro, and Macro Playback, where you manage and replay macros you've already recorded.
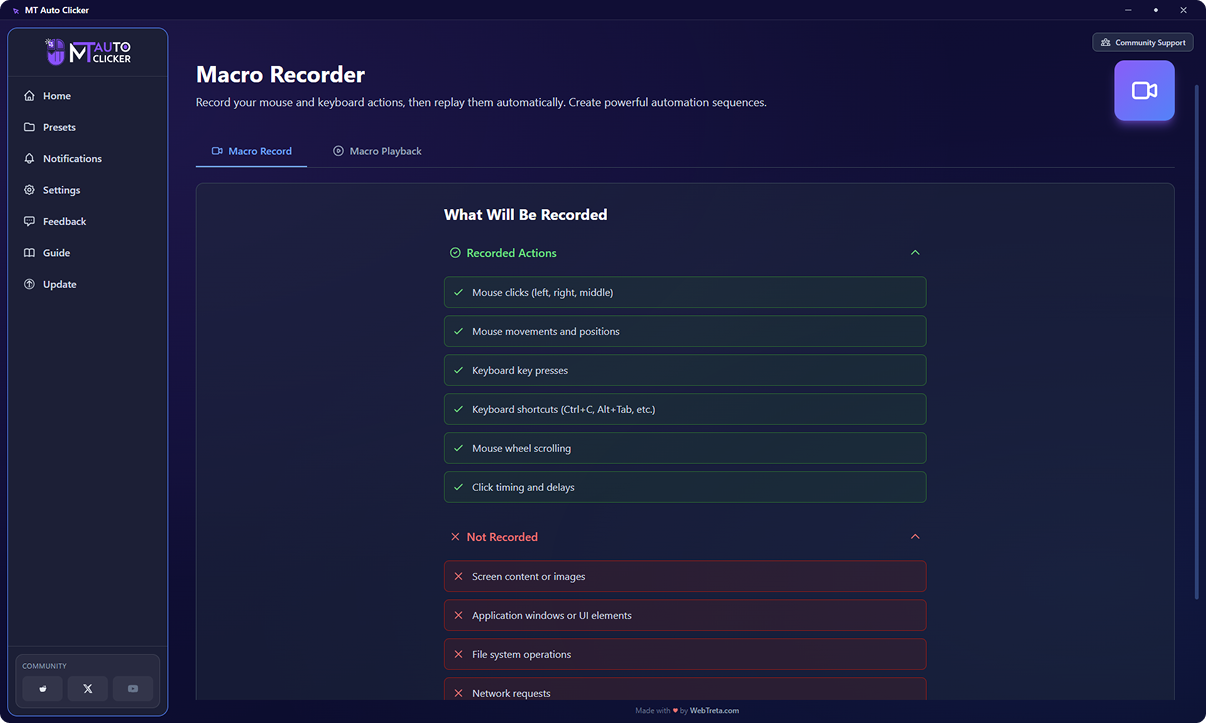
Step 2: Check What Gets Recorded
Before recording, the Macro Record tab shows two expandable lists so you know exactly what will and won't be captured.
Recorded:
- Mouse clicks (left, right, middle)
- Mouse movements and positions
- Keyboard key presses
- Keyboard shortcuts (Ctrl+C, Alt+Tab, and similar)
- Mouse wheel scrolling
- Click timing and delays
Not recorded:
- Screen content or images
- Application windows or UI elements
- File system operations
- Network requests
- System-level operations
Step 3: Start Recording
Click Start Record. A small “Ready to Record” widget appears on your screen with two buttons: Record and Exit. Click Record to begin capturing your actions.
Step 4: Perform Your Actions
Once recording starts, the widget switches to show a live Recording status, with Stop Recording and Show buttons. A counter badge in the corner of your screen tracks the number of actions recorded in real time.
Perform whatever mouse and keyboard actions you want captured. When you're done, click Stop Recording.
Step 5: Find Your Recording
Your finished recording appears under the Macro Playback tab, listed under Recent Macro Records. Each entry shows its name, duration, total actions recorded, and how recently it was made.
Step 6: Manage a Recorded Macro
Each macro in the list has four actions:
Hotkey: opens a dialog where you set a key combination (for example, Ctrl+Shift+M) to start or stop that specific macro from anywhere, without opening the app
Play: opens the floating Macro Recorder playback widget
Save: opens a dialog to save the macro as a named preset in your presets list
Delete (trash icon): removes the macro
Step 7: Play Back a Macro
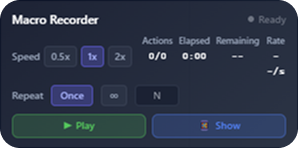
Clicking Play opens a floating playback widget with the following controls:
Speed: choose 0.5x, 1x, or 2x playback speed
Repeat: choose Once, infinite (the loop icon), or N to enter a custom repeat count
Stats: shows total actions, elapsed time, remaining time, and current rate
Play: starts playback
Show: brings the MT Auto Clicker app window back to the front
Step 8: Pause or Stop Playback
Press F6 at any time to pause or resume the currently playing macro.
Press Ctrl + Shift + F9 / Cmd + Shift + F9 to stop playback immediately, hide any floating widgets, and return to the main MT Auto Clicker window. Use this as your emergency stop if F6 doesn't feel fast enough or you want to stop everything at once.
Both shortcuts can be changed to a different key combination from Settings.
Feature 4 of 8
Auto Scroll
Moves the page automatically in a direction you choose, at a speed and distance you set. Built for reading long documents or pages without touching your mouse wheel.
Step 1: Open Auto Scroll
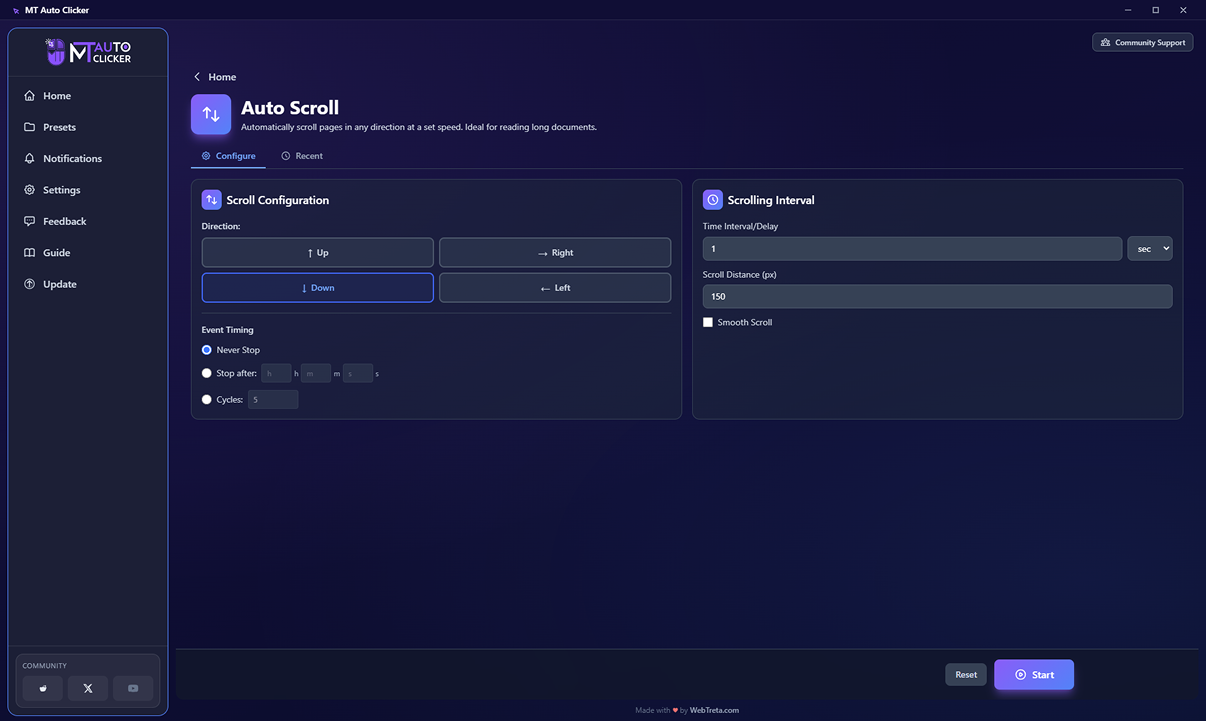
From the Home screen, click the Auto Scroll tile. Two tabs sit at the top: Configure, where you set everything up, and Recent, where you can review or reuse settings from a past run.
Step 2: Choose a Direction (left column)
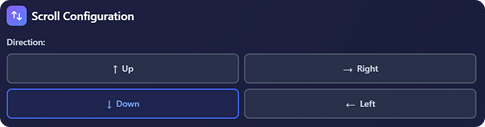
Pick one of four directions: Up, Right, Down, or Left.

Step 3: Set Event Timing (left column)
Choose how long the scrolling should run:
Never Stop
scrolling continues until you stop it manually
Stop after
enter hours, minutes, and seconds in the separate h / m / s fields
Cycles
enter the exact number of scroll actions you want
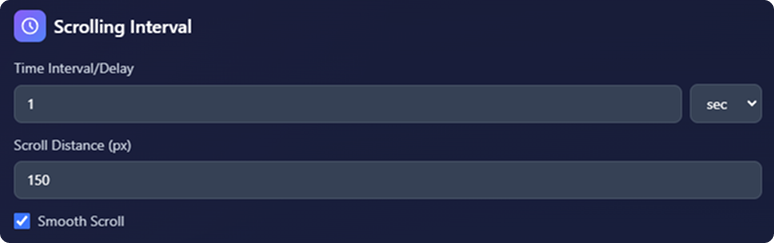
Step 4: Set the Scrolling Interval (right column)
Configure how far and how often the page scrolls:
Time Interval/Delay: the pause between each scroll action, in the unit you choose from the dropdown (seconds by default)
Scroll Distance (px): how many pixels the page moves with each scroll action
Smooth Scroll: check this box for a gradual, animated scroll instead of an instant jump
Step 5: Click Start
Click Start at the bottom of the screen. A floating Auto Scroll widget appears on your screen, showing a Position button, your chosen direction, and a Ready status. Play and Show stay disabled until you set a position.
Use Reset at any point before starting to clear your configuration and start over.

Step 6: Set Your Scroll Position
Click the Position button on the widget. It switches to a Selecting state, click anywhere on your screen to set that as your scroll position. Press ESC at any point to cancel the selection.
Once set, the widget shows the exact coordinates you picked, and Play, Show, and Change all become active.
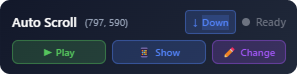
Step 7: Control the Automation
Once your scroll position is set, control the automation with:
Play: starts scrolling
Show: brings the MT Auto Clicker app window back to the front
Change: lets you pick a new scroll position without restarting your configuration
Step 8: Pause or Stop Scrolling
Press F6 at any time to pause or resume. Press Ctrl + Shift + F9 / Cmd + Shift + F9 to stop immediately, hide any floating widgets, and return to the main MT Auto Clicker window. Both shortcuts can be changed to a different key combination from Settings.
Feature 5 of 8
Auto Hotkey
Assigns a key combination that triggers a specific action whenever you press it, anywhere on your screen.
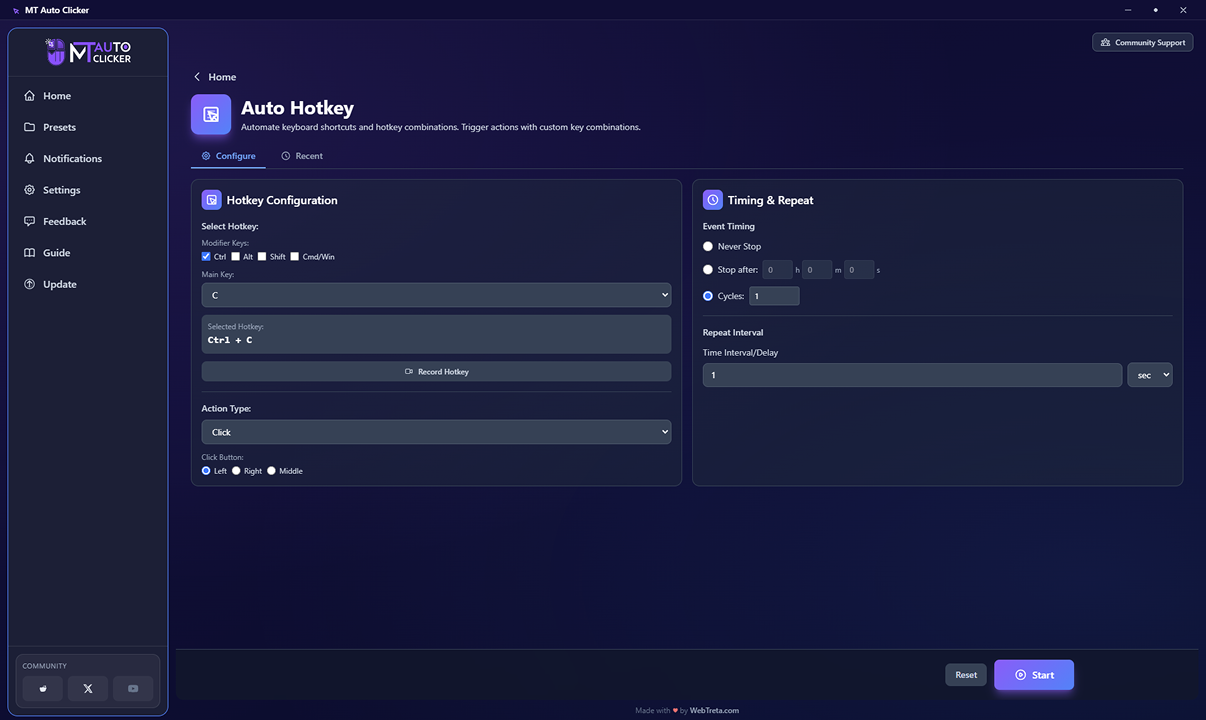
Step 1: Open Auto Hotkey
From the Home screen, click the Auto Hotkey tile. Two tabs sit at the top: Configure, where you set everything up, and Recent, where you can review or reuse settings from a past run.
Unlike other features, nothing runs immediately when you click Start, it arms the hotkey and waits for you to press it.
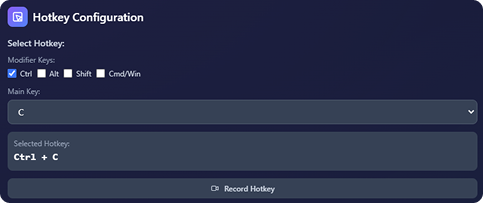
Step 2: Set Your Hotkey (left column)
You can set the hotkey combination two ways, and they work independently of each other, use one or the other:
Manually
check any combination of Modifier Keys (Ctrl, Alt, Shift, Cmd/Win), then choose a Main Key from the dropdown
Record Hotkey
click this button and press your combination directly on your keyboard
Either way, the combination you've set shows in the Selected Hotkey box below (for example, Ctrl + C / Cmd + C).

Step 3: Choose an Action Type (left column)
Select what should happen when your hotkey is pressed:
- Click: performs a mouse click. Choose Left, Right, or Middle as the Click Button.
- Type Text
- Run Preset
- Open Application
- Custom Script

Step 4: Set Event Timing (right column)
Choose how long the hotkey stays active once triggered:
Never Stop
the action repeats until you stop it manually
Stop after
enter hours, minutes, and seconds
Cycles
enter the exact number of times the action should repeat

Step 5: Set the Repeat Interval (right column)
Enter the delay between each repeat of the action, in the unit you choose from the dropdown (seconds by default).
Step 6: Click Start
Click Start at the bottom of the screen. This arms the hotkey, it doesn't run the action yet. A notification badge appears on your screen confirming the hotkey is armed and ready.
Step 7: Trigger the Action
Press your hotkey combination anywhere on your screen to run the configured action. It repeats according to your Event Timing and Repeat Interval settings until the stop condition is met.
Step 8: Stop the Automation
Press Ctrl + Shift + F9 / Cmd + Shift + F9 at any time to stop all running automations across the app and return to the main window.
Feature 6 of 8
Auto Refresh
Automatically reloads a page or application at intervals you set. Keeps content up to date without refreshing manually. This feature is currently in BETA.
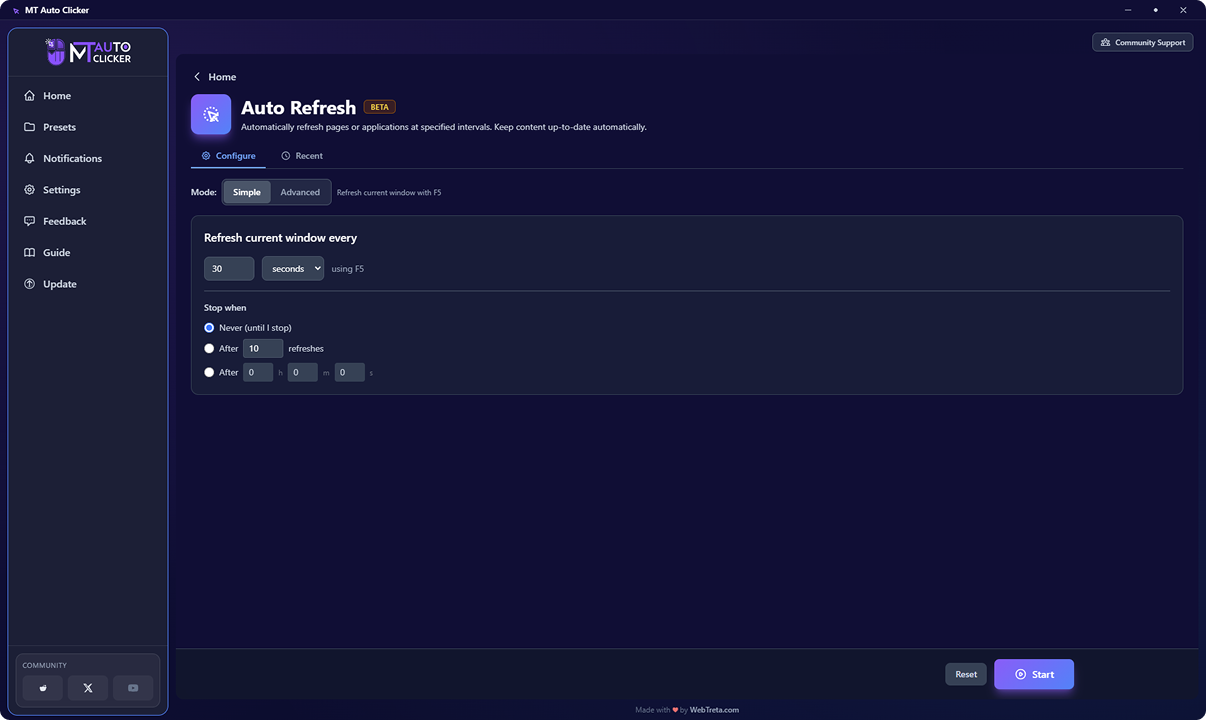
Step 1: Open Auto Refresh
From the Home screen, click the Auto Refresh tile. Two tabs sit at the top: Configure, where you set everything up, and Recent, where you can review or reuse settings from a past run.

Step 2: Choose a Mode
At the top of the Configure screen, choose Simple or Advanced.
Simple
a quick setup using F5 to refresh, with just an interval and a stop condition
Advanced
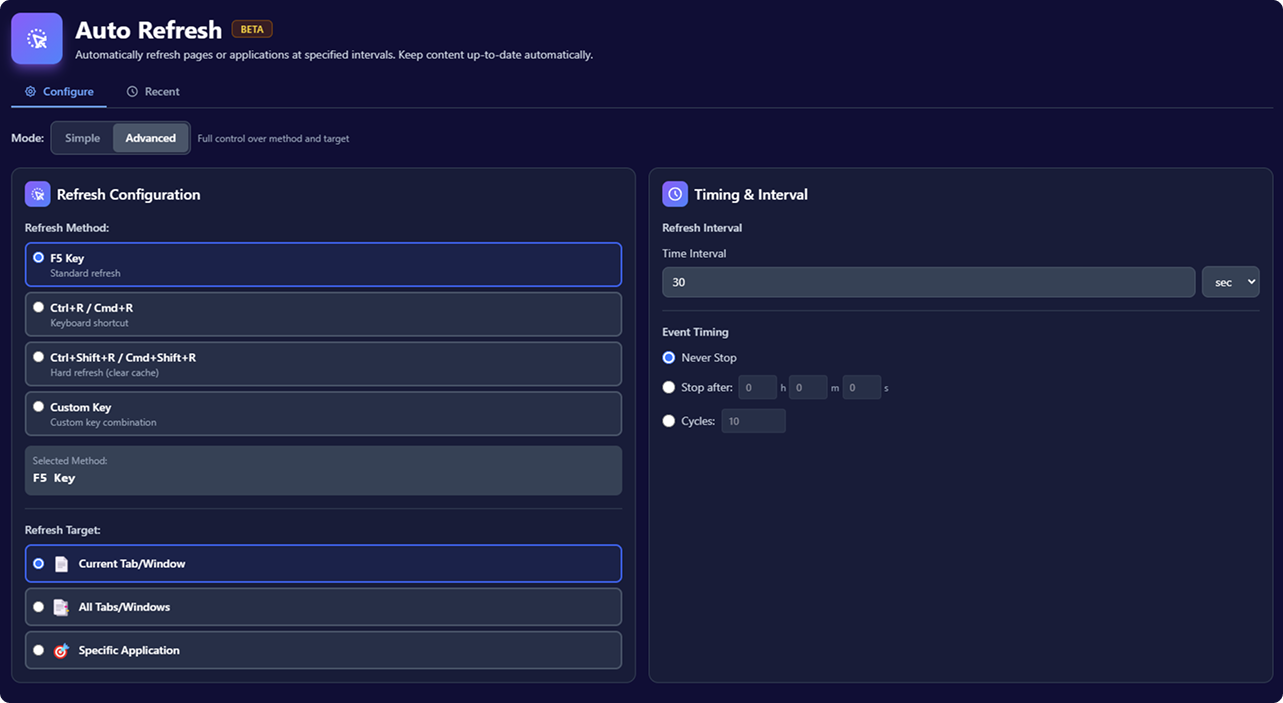
full control over the refresh method, target, and timing
Simple Mode
Simple Mode
Set how often the current window refreshes, in the unit you choose from the dropdown, always using the F5 key. Then choose when it should stop:
Never (until I stop)
keeps refreshing until you stop it manually
After a set number of refreshes
enter the exact count
After a set duration
enter hours, minutes, and seconds
Advanced Mode
Advanced Mode
Advanced mode splits into two columns.
Refresh Configuration (left column):
Refresh Method: choose F5 Key (standard refresh), Ctrl+R / Cmd+R (keyboard shortcut), Ctrl+Shift+R / Cmd+Shift+R (hard refresh, clears cache), or Custom Key. Selecting Custom Key opens a recorder input where you press your own key combination, the same way you'd set a hotkey in Settings.
Refresh Target: choose Current Tab/Window, All Tabs/Windows, or Specific Application.
Timing & Interval (right column):
Refresh Interval: the time between refreshes, in the unit you choose from the dropdown
Event Timing: Never Stop, Stop after a set duration (h/m/s), or Cycles for an exact number of refreshes
Step 3: Click Start
Click Start at the bottom of the screen. Unlike other features, Auto Refresh doesn't open a floating control widget. Instead, a small notification badge appears in the corner of your screen showing:
Key: the refresh method currently active
Remaining: how much longer it will run, or “Until you stop” if set to never stop
Stop: the key that stops Auto Refresh
Step 4: Stop the Automation
Press the stop key shown on the notification badge (F12 by default) to stop Auto Refresh specifically. You can also press Ctrl + Shift + F9 / Cmd + Shift + F9 at any time to stop all running automations across the app and return to the main window.
Feature 7 of 8
Auto Swipe
Performs swipe gestures automatically in a direction you choose, at a distance and interval you set.
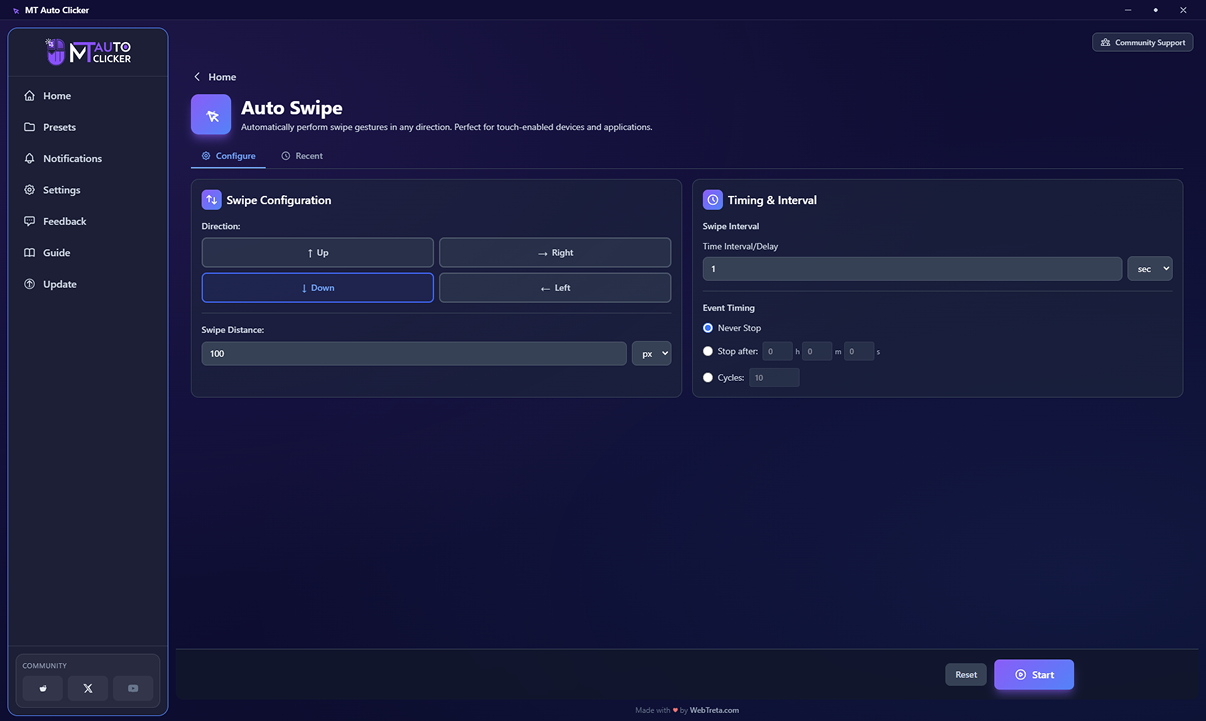
Step 1: Open Auto Swipe
From the Home screen, click the Auto Swipe tile. Two tabs sit at the top: Configure, where you set everything up, and Recent, where you can review or reuse settings from a past run.
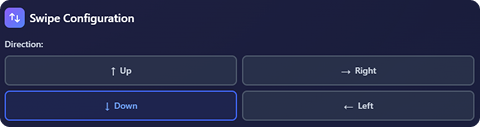
Step 2: Choose a Direction (left column)
Pick one of four directions: Up, Right, Down, or Left.

Step 3: Set the Swipe Distance (left column)
Enter how far each swipe should travel, in the unit you choose from the dropdown (px by default).
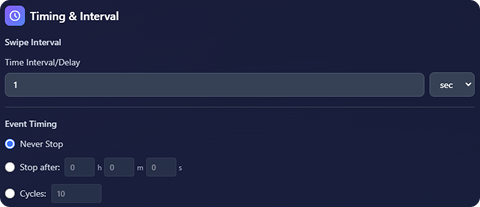
Step 4: Set the Swipe Interval (right column)
Enter the delay between each swipe, in the unit you choose from the dropdown (seconds by default).
Step 5: Set Event Timing (left column)
Choose how long the swiping should run:
Never Stop
swiping continues until you stop it manually
Stop after
enter hours, minutes, and seconds in the separate h / m / s fields
Cycles
enter the exact number of swipes you want
Step 6: Click Start
Click Start at the bottom of the screen. A floating widget appears on your screen for you to set your swipe's starting position, the same way Auto Scroll works.
Use Reset at any point before starting to clear your configuration and start over.
Step 7: Set Your Swipe Position
Click the Position button on the widget, then click anywhere on your screen to set that as your swipe's starting point. Press ESC at any point to cancel the selection.
Once set, the widget shows the exact coordinates you picked, and Play, Show, and Change all become active.
Step 8: Control the Automation
Once your swipe position is set, control the automation with:
Play: starts swiping
Show: brings the MT Auto Clicker app window back to the front
Change: lets you pick a new swipe position without restarting your configuration
Step 9: Pause or Stop Swiping
Press F6 at any time to pause or resume. Press Ctrl + Shift + F9 / Cmd + Shift + F9 to stop immediately, hide any floating widgets, and return to the main MT Auto Clicker window. Both shortcuts can be changed to a different key combination from Settings.
Feature 8 of 8
Auto Screenshot
Captures your screen automatically at intervals you set. Supports four capture modes and can save each screenshot without needing you to review it first. This feature is currently in BETA.
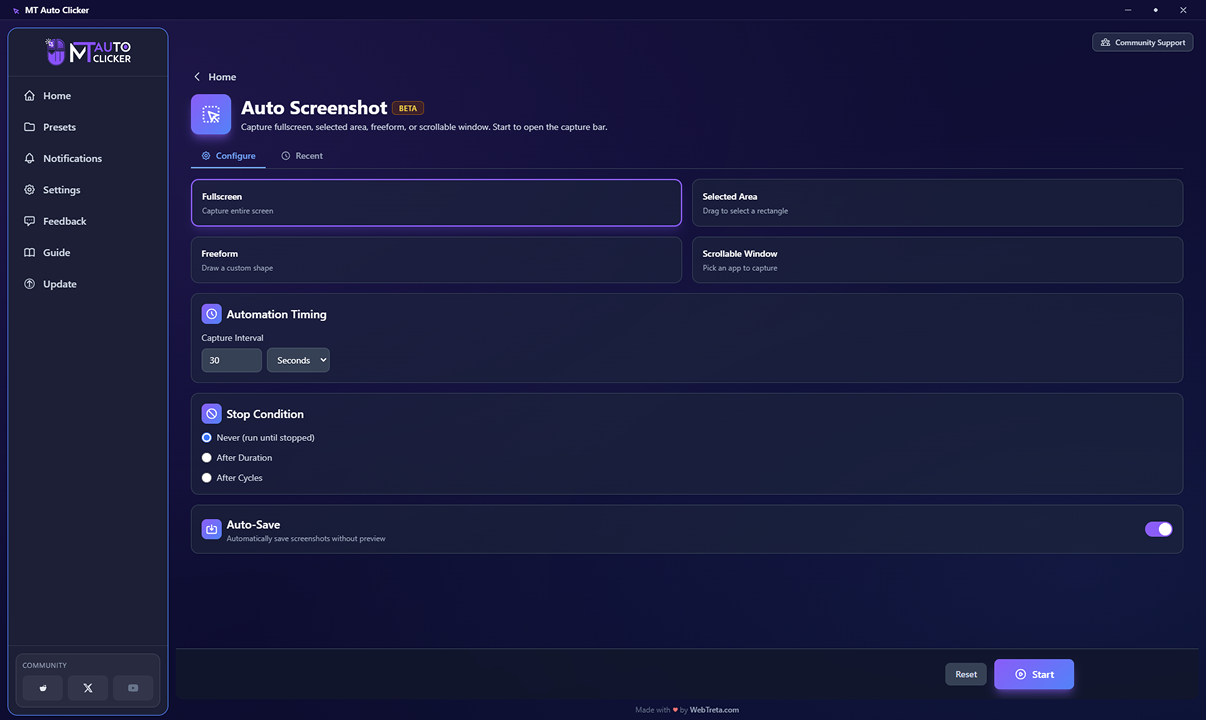
Step 1: Open Auto Screenshot
From the Home screen, click the Auto Screenshot tile. Two tabs sit at the top: Configure, where you set everything up, and Recent, where you can review or reuse settings from a past run.
Step 2: Choose a Capture Mode
Pick one of four modes:
Fullscreen
captures your entire screen
Selected Area
captures a rectangle you drag to select
Freeform
captures a custom shape you draw
Scrollable Window
captures a specific application, including content beyond what's visible on screen
If you choose Scrollable Window, a Select Application search box appears below the mode cards. Search for and pick the application you want to capture.

Step 3: Set the Capture Interval
Enter how often a screenshot should be taken, in the unit you choose from the dropdown: Seconds, Minutes, or Hours.

Step 4: Set the Stop Condition
Choose when capturing should stop:
Never (run until stopped)
keeps capturing until you stop it manually
After Duration
enter hours, minutes, and seconds
After Cycles
enter the exact number of screenshots you want
Step 5: Set Auto-Save
Auto-Save is on by default and automatically saves each screenshot without showing you a preview first. Turn it off if you'd rather review each capture before it's saved.
Step 6: Click Start
Click Start at the bottom of the screen. This opens a capture bar on your screen, similar to a native Windows screen-capture selection toolbar.
If you chose Selected Area or Freeform, use the capture bar to drag your rectangle or draw your shape before capturing begins. Fullscreen and Scrollable Window don't require this step, since the capture area is already defined.
Step 7: Pause or Stop Capturing
Press F6 at any time to pause or resume. Press Ctrl + Shift + F9 / Cmd + Shift + F9 to stop immediately, hide any floating widgets, and return to the main MT Auto Clicker window. Both shortcuts can be changed to a different key combination from Settings.