
Extension Guide
MT Auto Clicker Extension Guide
A complete, step-by-step walkthrough of every feature in the MT Auto Clicker extension — from Setup screen options to the on-page floating control bar.
Feature 1 of 8
How to Use Single Target Clicking in the MT Auto Clicker Extension
Single Target Clicking automates clicks at one position on the page.
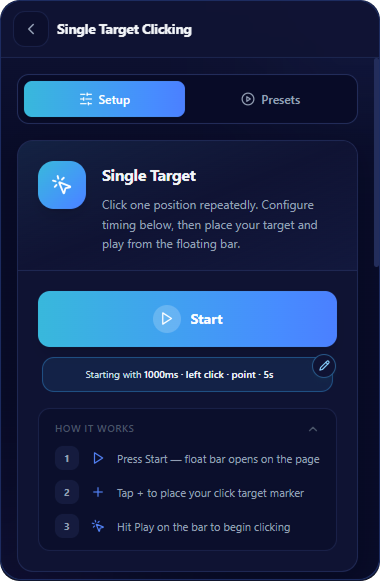
Open Single Target Clicking
Select Single Target Clicking from the extension. The Setup tab shows a Start button and, below it, a summary bar (“Starting with 1000ms · left click · point · 5s”) with an edit icon. A second tab, Presets, sits next to Setup.
- Clicking Start launches the floating bar right away, using whatever configuration is currently set.
- Clicking the summary bar (or its edit icon) jumps you down to the detailed settings below. These same settings are also available by scrolling down the Setup screen directly.
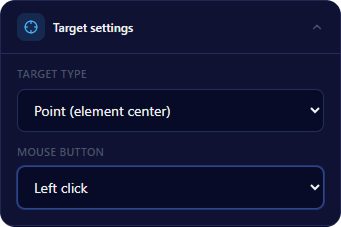
Set Target Settings
Target Type
dropdown, default Point (element center). Options: Point (element center), Zone (random in area)
Mouse Button
dropdown, default Left click. Options: Left click, Right click, Middle click
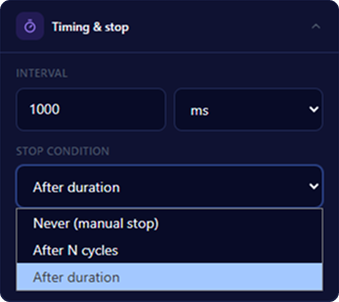
Set Timing & Stop
Interval
enter a number and choose a unit from the dropdown (default 1000 ms)
Stop Condition
dropdown, default After duration. Options:
Never (manual stop): clicking continues until stopped manually via hotkey
After N cycles: enter the number of clicks in the count field
After duration: set how long clicking should run, in the Duration (seconds) field
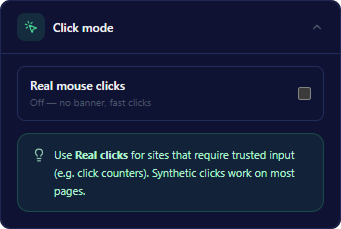
Choose Click Mode
Real mouse clicks
toggle, off by default
Off: labeled "Off — no banner, fast clicks"
On: labeled "On — debugger banner, CPS sites"
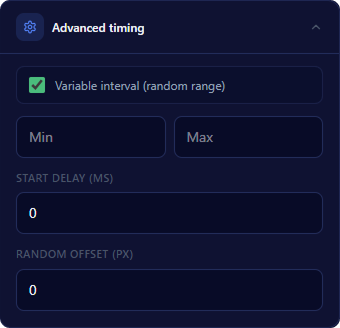
Fine-Tune with Advanced Timing (Optional)
Variable interval (random range)
checkbox. When checked, Min and Max fields appear for the interval range
Start Delay (ms)
number field, default 0
Random Offset (px)
number field, default 0

Click Start
Click Start. The floating control bar opens on the page.
- Click + first to place your target pointer at the position where you want to click.
- Click Play on the control bar to begin clicking.
The rest of the control bar buttons:
Save icon: saves the current configuration as a preset
Eye icon: shows or hides the target marker
Center/minimize icon: minimizes the floating bar
Gear icon: opens Feature Settings, where you can change Stop Condition (Never, Cycles, Duration with hr/min/sec fields) mid-session without closing the bar
X: closes the bar and stops the automation
Save as Preset
If you want to reuse this configuration later, click Save as preset at the bottom of the Setup panel, or use the Save icon on the control bar during a running session.
Feature 2 of 8
How to Use Multi Target Clicking in MT Auto Clicker Extension
Multi Target Clicking automates clicks across multiple positions on the page.
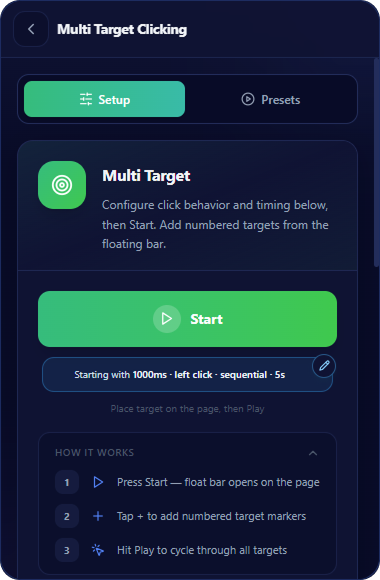
Open Multi Target Clicking
Select Multi Target Clicking from the extension. The Setup tab shows a Start button and, below it, a summary bar (“Starting with 1000ms · left click · sequential · 5s”) with an edit icon, and a line reading “Place target on the page, then Play.” A second tab, Presets, sits next to Setup.
- Clicking Start launches the floating bar right away, using whatever configuration is currently set.
- Clicking the summary bar (or its edit icon) jumps you down to the detailed settings below. These same settings are also available by scrolling down the Setup screen directly.
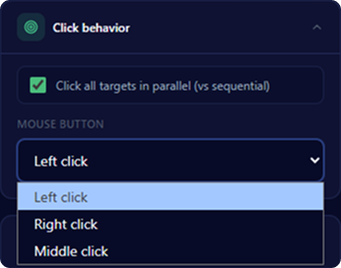
Set Click Behavior
Click all targets in parallel (vs sequential)
checkbox, (default to be confirmed)
Mouse Button
dropdown, default Left click. Options: Left click, Right click, Middle click
Checked: all targets click at the same time
Unchecked: targets click one after another in sequence
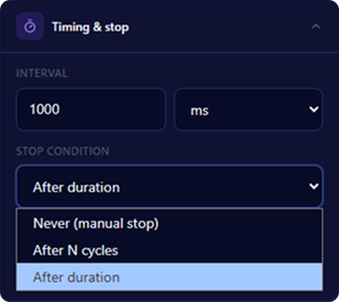
Set Timing & Stop
Interval
enter a number and choose a unit from the dropdown (default 1000 ms)
Stop Condition
dropdown, default After duration
Duration (seconds)
enter a number (default 5)
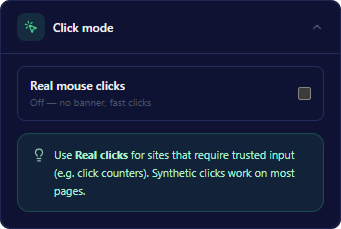
Choose Click Mode
Real mouse clicks
toggle, off by default
Off: labeled "Off — no banner, fast clicks"
On: labeled "On — debugger banner, CPS sites"
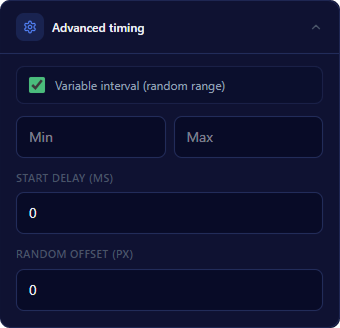
Fine-Tune with Advanced Timing (Optional)
Variable interval (random range)
checkbox, off by default. When checked, Min and Max fields appear for the interval range
Start Delay (ms)
number field, default 0
Random Offset (px)
number field, default 0
Click Start
Click Start. The floating control bar opens on the page.
- Click + to place a numbered target marker at the position where you want to click. Click + again to add another target, repeat for as many targets as needed.
- Click Play on the control bar to cycle through all placed targets.
The rest of the control bar buttons:
Save icon: saves the current configuration as a preset
Eye icon: shows or hides the target markers
Center/minimize icon: minimizes the floating bar
Gear icon: opens Feature Settings, where you can change Stop Condition mid-session without closing the bar
X: closes the bar and stops the automation
Save as Preset
If you want to reuse this configuration later, click Save as preset at the bottom of the Setup panel, or use the Save icon on the control bar during a running session.
Feature 3 of 8
How to Use Macro Recorder in MT Auto Clicker Extension
Macro Recorder captures your mouse, keyboard, and scroll actions on a page so you can play them back later.
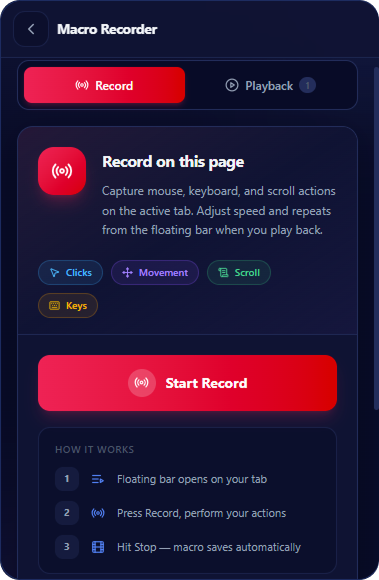
Open Macro Recorder
Select Macro Recorder from the extension. Two tabs sit at the top: Record and Playback.
The Record tab shows:
- A description: capture mouse, keyboard, and scroll actions on the active tab, with speed and repeats adjustable from the floating bar during playback
- Four tags: Clicks, Movement, Scroll, Keys
- A Start Record button
How it works
- Floating bar opens on your tab.
- Press Record, perform your actions.
- Hit Stop, the macro saves automatically.
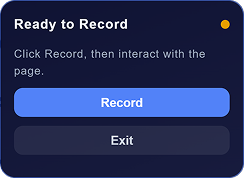
Start Recording
Click Start Record. A floating widget appears on the page labeled "Ready to Record" with the instruction "Click Record, then interact with the page." Two buttons: Record and Exit.
Click Record to begin. The widget switches to a "Recording..." state showing the number of actions recorded so far, with a Stop Recording button.
Stop and Save
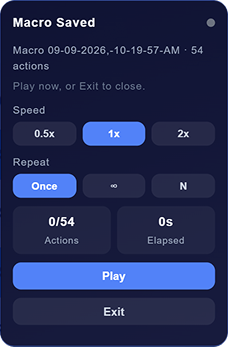
Click Stop Recording. A "Macro Saved" panel appears, showing:
- The macro’s name (date and timestamp) and total action count
- Speed: 0.5x, 1x, 2x
- Repeat: Once, ∞, N
- Action count and elapsed time, starting at 0
- Play and Exit buttons
Play Back a Macro
Click Play from the Macro Saved panel, or from a saved recording. A "Macro Playback" panel appears with the same Speed and Repeat controls, plus a live action count and elapsed time as it runs. Buttons: Pause, Stop, Exit.
Manage Recordings
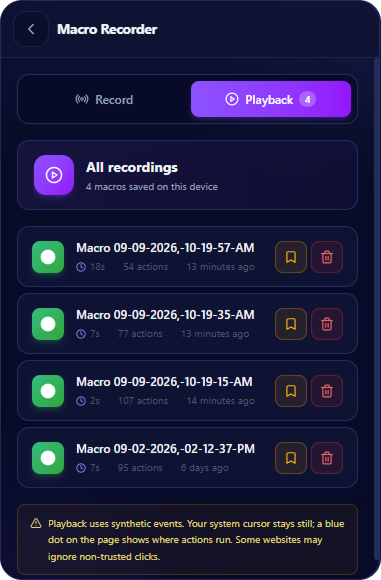
Back on the Macro Recorder screen, the Recent recordings section lists saved macros, each showing duration, action count, and time saved, with bookmark and trash icons next to each entry.
An Open playback library link leads to the Playback tab, which shows All recordings with a count of macros saved on the device, the same list with bookmark and trash icons, and a note: "Playback uses synthetic events. Your system cursor stays still; a blue dot on the page shows where actions run. Some websites may ignore non-trusted clicks."
Feature 4 of 8
How to Use Auto Hotkey in MT Auto Clicker Extension
Auto Hotkey binds a keyboard shortcut on the page to repeat keys or launch a saved preset.
Open Auto Hotkey
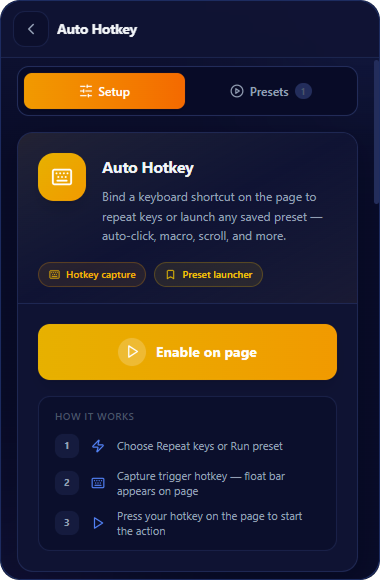
Select Auto Hotkey from the extension. Two tabs sit at the top: Setup and Presets.
The Setup tab shows a description of the feature, two tags, Hotkey capture and Preset launcher, and an Enable on page button.
How it works
- Choose Repeat keys or Run preset.
- Capture trigger hotkey, the floating bar appears on the page.
- Press your hotkey on the page to start the action.
Choose Action Mode
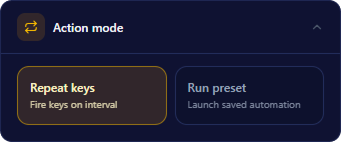
Auto Hotkey has two modes:
Repeat keys: fire keys on an interval
Run preset: launch a saved automation
Repeat Keys Mode
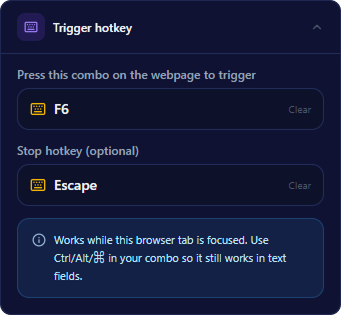
Set Trigger Hotkey
Press this combo on the webpage to trigger
hotkey field, default F6, with a Clear option
Stop hotkey (optional)
hotkey field, default Escape, with a Clear option
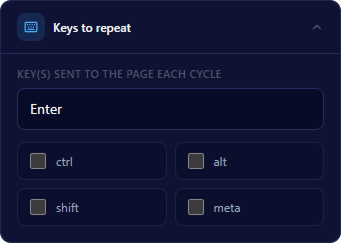
Set Keys to Repeat
Key(s) sent to the page each cycle
text field, default Enter
Modifier checkboxes
ctrl, alt, shift, meta
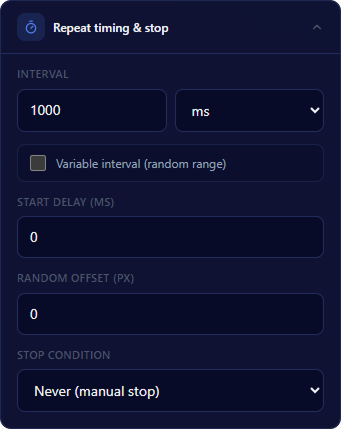
Set Repeat Timing & Stop
Interval
enter a number and choose a unit from the dropdown (default 1000 ms)
Variable interval (random range)
checkbox, off by default; if want min and max then click on chebox to on
Start Delay (ms)
number field, default 0
Random Offset (px)
number field, default 0
Stop Condition
dropdown, default Never (manual stop). Options: Never (manual stop), After N cycles, After duration
Run Preset Mode
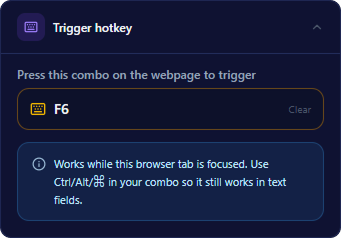
Set Trigger Hotkey
Press this combo on the webpage to trigger
hotkey field, default F6, with a Clear option
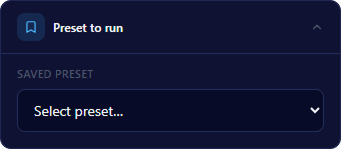
Choose Preset to Run
Saved preset
dropdown, shows “Select preset…” when empty
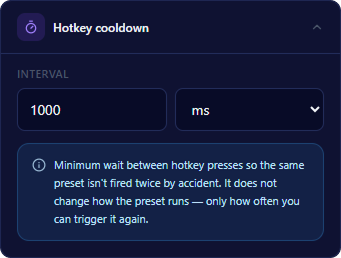
Set Hotkey Cooldown
Interval
enter a number and choose a unit from the dropdown (default 1000 ms)
Using Auto Hotkey
Enable on Page
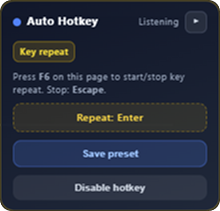
Click Enable on page. A floating widget appears showing:
- Feature name and status (e.g. “Auto Hotkey · Running”)
- Current mode (e.g. “Key repeat”)
- A reminder of your trigger and stop hotkeys
- The key being repeated
- Cycles and Elapsed counters
- Pause and Stop buttons
- Save preset button
- Disable hotkey button
Auto Hotkey does not use the same floating control bar as other features. It has its own widget, since there is no on-page target to place.
Save as Preset
Click Save as preset, either from the Setup panel or from the running widget. Saved presets appear under the Presets tab, showing the preset name, mode and interval summary, and when it was saved. Each preset has a settings icon to edit it and a trash icon to delete it.
Feature 5 of 8
How to Use Auto Scroll in MT Auto Clicker Extension
Auto Scroll automates page scrolling in a direction you choose, at a speed and interval you set.
Open Auto Scroll
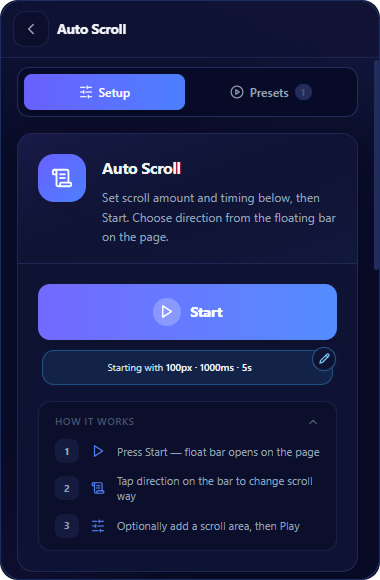
Select Auto Scroll from the extension. The Setup tab shows a Start button and, below it, a summary bar (“Starting with 100px · 1000ms · 5s”) with an edit icon. A second tab, Presets, sits next to Setup.
- Clicking Start launches the floating bar right away, using whatever configuration is currently set.
- Clicking the summary bar (or its edit icon) jumps you down to the detailed settings below. These same settings are also available by scrolling down the Setup screen directly.
How it works
- Press Start, the floating bar opens on the page.
- Tap a direction on the bar to change scroll direction.
- Optionally add a scroll area, then Play.
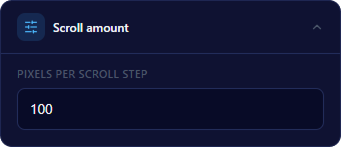
Set Scroll Amount
Pixels per scroll step
number field, default 100
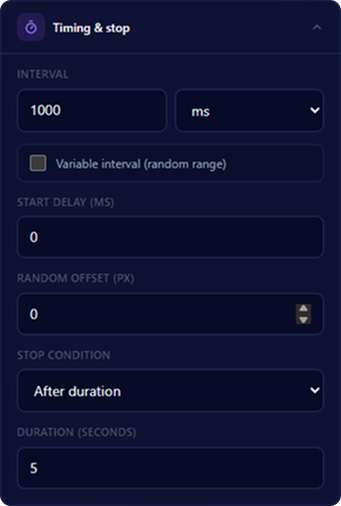
Set Timing & Stop
Interval
enter a number and choose a unit from the dropdown (default 1000 ms)
Variable interval (random range)
checkbox, off by default
Start Delay (ms)
number field, default 0
Random Offset (px)
number field, default 0
Stop Condition
dropdown, default After duration. Options: Never (manual stop), After N cycles, After duration
Duration (seconds)
enter a number (default 5), shown when Stop Condition is set to After duration
Save as Preset
Click Save as preset at the bottom of the Setup panel.
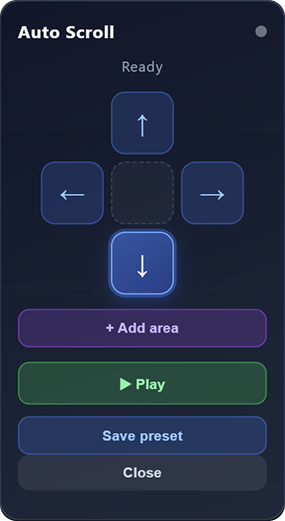
Click Start
Click Start. The floating bar opens on the page, showing:
- Status label (“Ready”)
- Four direction buttons: up, down, left, right, arranged around a blank center spacer
- + Add area button
- Play button
- Save preset button
- Close button
Tap a direction button to set which way the page scrolls. Click Play to begin scrolling in that direction.
Add a Scroll Area (Optional)
Click + Add area. A prompt appears: “Click an element on this page. Press Esc to cancel.” Click an element on the page to target that section, scrolling will then happen within that designated area instead of the full page. Press Esc to cancel without setting an area.
Save as Preset
Click Save as preset, either from the Setup panel or from the running widget. Saved presets appear under the Presets tab, showing the preset name, direction, interval, and stop condition summary, and when it was saved. Each preset has a settings icon to edit it and a trash icon to delete it.
Feature 6 of 8
How to Use Auto Refresh in MT Auto Clicker Extension
Auto Refresh reloads the current tab on a schedule. It keeps working even when the tab is in the background.
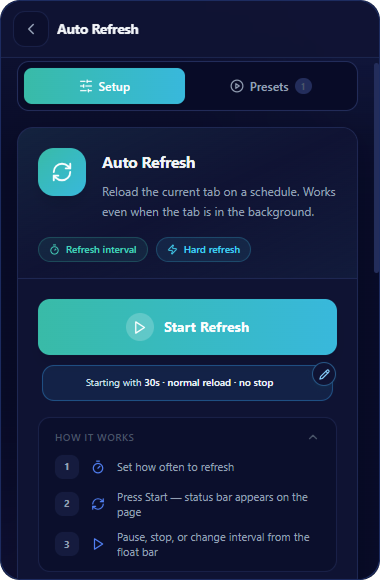
Open Auto Refresh
Select Auto Refresh from the extension. The Setup tab shows a Start Refresh button and, below it, a summary bar (“Starting with 30s · normal reload · no stop”) with an edit icon. Two tags appear above it: Refresh interval and Hard refresh. A second tab, Presets, sits next to Setup.
- Clicking Start Refresh launches the floating bar right away, using whatever configuration is currently set.
- Clicking the summary bar (or its edit icon) jumps you down to the detailed settings below. These same settings are also available by scrolling down the Setup screen directly.
How it works
- Set how often to refresh.
- Press Start, a status bar appears on the page.
- Pause, stop, or change the interval from the floating bar.
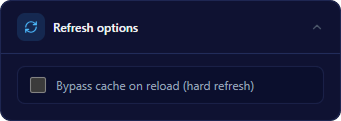
Set Refresh Options
Bypass cache on reload (hard refresh)
checkbox, off by default
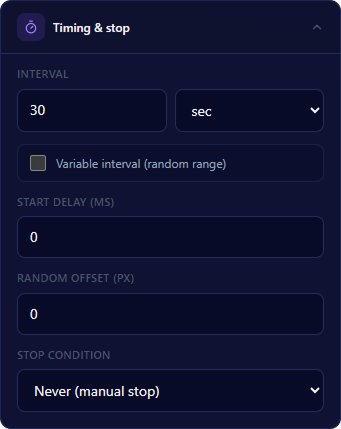
Set Timing & Stop
Interval
enter a number and choose a unit from the dropdown (default 30 sec)
Variable interval (random range)
checkbox, off by default. When checked, Min and Max fields appear for the interval range
Start Delay (ms)
number field, default 0
Random Offset (px)
number field, default 0
Stop Condition
dropdown, default Never (manual stop). Options: Never (manual stop), After N cycles, After duration
Save as Preset
Click Save as preset at the bottom of the Setup panel.
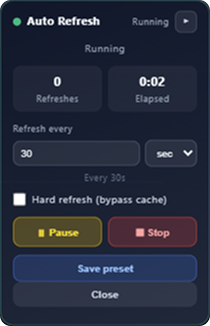
Click Start Refresh
Click Start Refresh. A floating widget appears on the page, showing:
- Feature name and status (e.g. “Auto Refresh · Running”)
- Refreshes and Elapsed counters
- Refresh every field, with a unit dropdown (seconds, minutes)
- Hard refresh (bypass cache) checkbox
- Pause and Stop buttons
- Save preset button
- Close button
Save as Preset
Click Save as preset, either from the Setup panel or from the running widget. Saved presets appear under the Presets tab, showing the preset name, interval, and when it was saved. Each preset has a settings icon to edit it and a trash icon to delete it.
Feature 7 of 8
How to Use Auto Swipe in MT Auto Clicker Extension
Auto Swipe repeats swipe gestures on an element you choose.
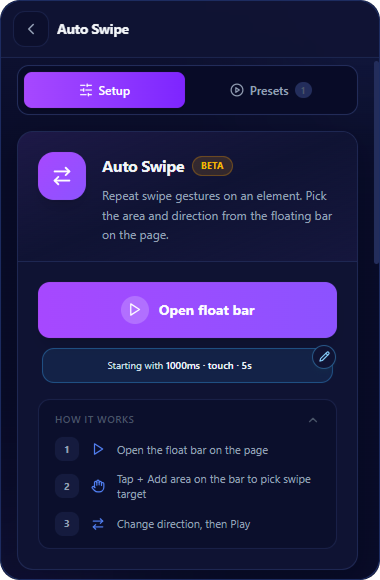
Open Auto Swipe
Select Auto Swipe from the extension. The Setup tab shows an Open float bar button and, below it, a summary bar (“Starting with 1000ms · touch · 5s”) with an edit icon. A second tab, Presets, sits next to Setup.
- Clicking Open float bar launches the floating bar right away, using whatever configuration is currently set.
- Clicking the summary bar (or its edit icon) jumps you down to the detailed settings below. These same settings are also available by scrolling down the Setup screen directly.
How it works
- Open the float bar on the page.
- Tap + Add area on the bar to pick the swipe target.
- Change direction, then Play.
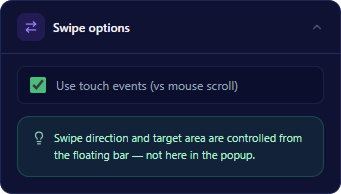
Set Swipe Options
Use touch events (vs mouse scroll)
checkbox, on by default
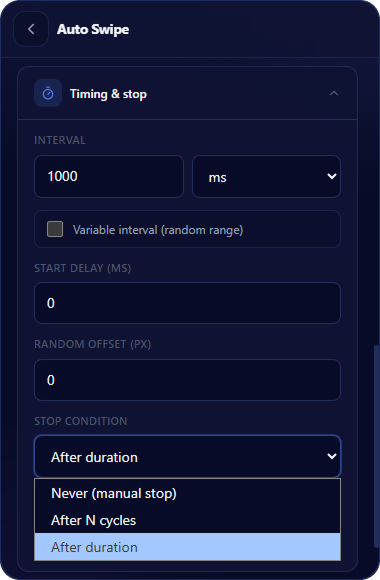
Set Timing & Stop
Interval
enter a number and choose a unit from the dropdown (default 1000 ms)
Variable interval (random range)
checkbox, off by default. When checked, Min and Max fields appear for the interval range
Start Delay (ms)
number field, default 0
Random Offset (px)
number field, default 0
Stop Condition
dropdown, default After duration. Options: Never (manual stop), After N cycles, After duration
Duration (seconds)
enter a number (default 5), shown when Stop Condition is set to After duration
Save as Preset
Click Save as preset at the bottom of the Setup panel.
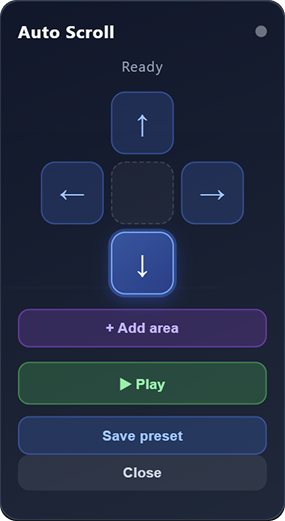
Open the Float Bar
Click Open float bar. A floating widget appears on the page, showing:
- Feature name and status label (“Ready”)
- Four direction buttons: up, down, left, right, arranged around a blank center spacer
- + Add area button
- Play button
- Save preset button
- Close button
Tap a direction button to set which way the swipe moves. Click + Add area, a prompt appears: “Click an element on this page. Press Esc to cancel.” Click an element on the page to set it as the swipe target, or press Esc to cancel. Click Play to begin swiping.
Save as Preset
Click Save as preset, either from the Setup panel or from the running widget. Saved presets appear under the Presets tab, showing the preset name, direction, interval, and stop condition summary, and when it was saved. Each preset has a settings icon to edit it and a trash icon to delete it.
Feature 8 of 8
How to Use Auto Screenshot in MT Auto Clicker Extension
Auto Screenshot captures screenshots of the page on a schedule, or on demand.
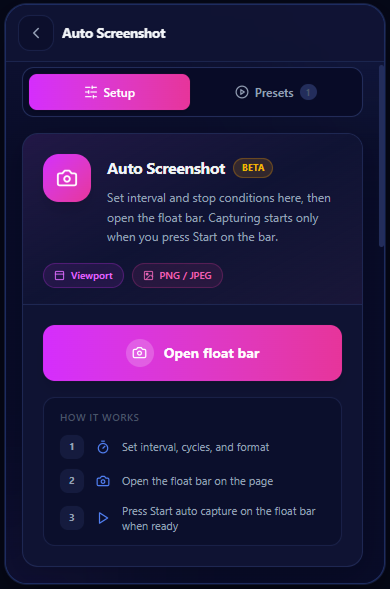
Open Auto Screenshot
Select Auto Screenshot from the extension. The Setup tab shows an Open float bar button. Two descriptive labels appear above it: Viewport and PNG / JPEG. A second tab, Presets, sits next to Setup.
How it works
- Set interval, cycles, and format.
- Open the float bar on the page.
- Press Start auto capture on the float bar when ready.
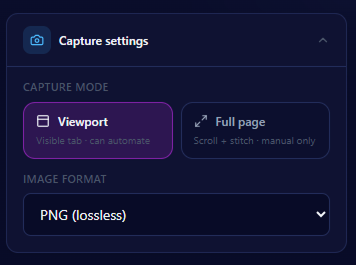
Choose Capture Settings
Capture mode
two options — Viewport: captures the visible tab, can run automatically. Full page: scrolls and stitches the full page, manual only.
Image format
dropdown, default PNG (lossless). Options: PNG (lossless), JPEG (smaller file), WebP (efficient), PDF (document)
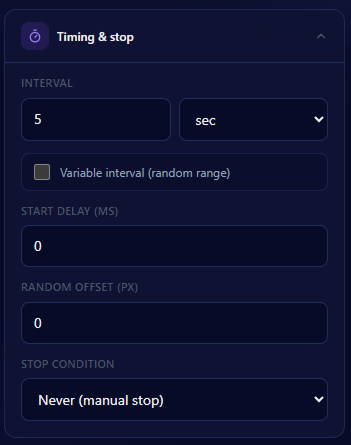
Set Timing & Stop (Viewport mode)
Interval
enter a number and choose a unit from the dropdown (default 5 sec)
Variable interval (random range)
checkbox, off by default
Start Delay (ms)
number field, default 0
Random Offset (px)
number field, default 0
Stop Condition
dropdown, default Never (manual stop). Options: Never (manual stop), After N cycles, After duration
Save as Preset
Click Save as preset at the bottom of the Setup panel.
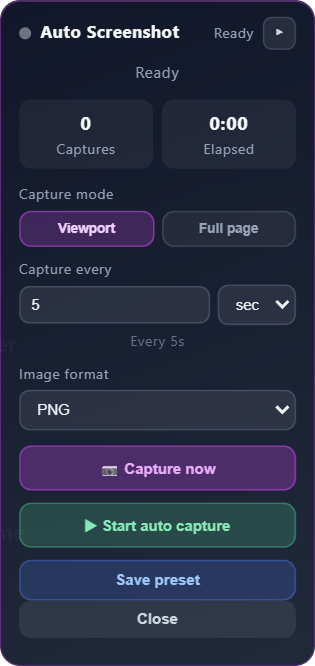
Open the Float Bar
Click Open float bar. A floating widget appears on the page, showing:
- Feature name and status label (“Ready”)
- Capture mode: Viewport / Full page toggle
- Image format dropdown
- Save preset button
- Close button
In Viewport mode, the widget also shows Captures and Elapsed counters, a Capture every field with a unit dropdown, a Start auto capture button to begin capturing on the interval set above, and a Capture now button to take a single screenshot immediately.
In Full page mode, the Captures and Elapsed counters do not appear, since capture is manual only. Only Capture now is shown, with a note reading “Full page is manual only, use Capture now.”
When a screenshot is taken, the widget briefly shows a “Saved” status with a “Screenshot saved · 100%” progress indicator.
Save as Preset
Click Save as preset, either from the Setup panel or from the running widget. Saved presets appear under the Presets tab, showing the preset name, capture mode, interval, and when it was saved. Each preset has a settings icon to edit it and a trash icon to delete it.