
Android Guide
MT Auto Clicker Android Guide
Step-by-step setup instructions for every MT Auto Clicker feature on Android: Single Target Clicking, Multi Target Clicking, Macro Recorder, Full Page Screenshot, and Auto Refresh.
Feature 1 of 5
Single Target Clicking
Single Target Clicking automates taps at one position, or within one area, on the screen.
Open Single Target
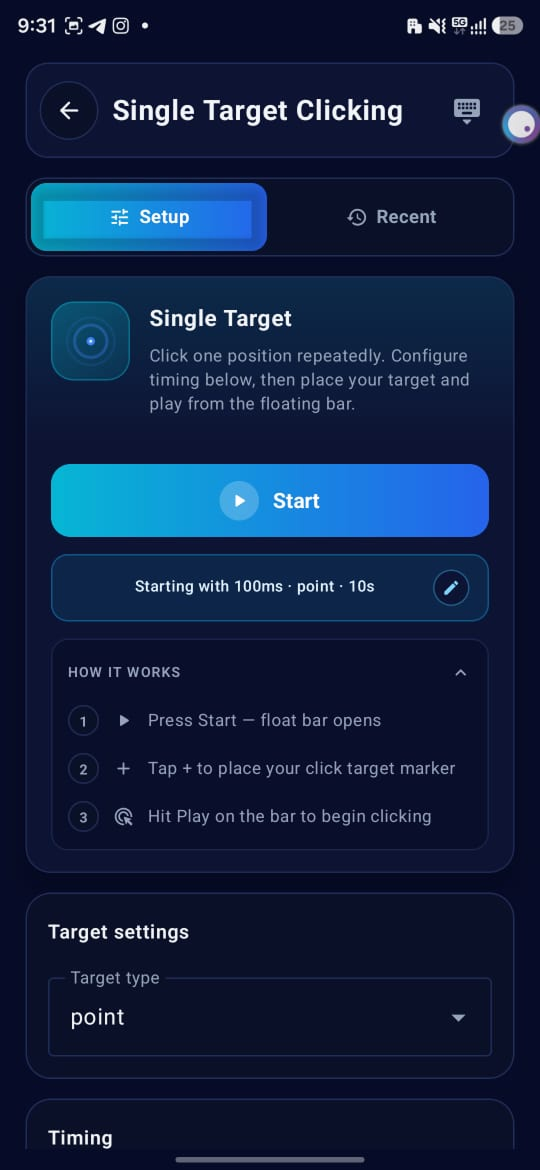
Select Single Target from the Home screen. The Setup tab shows a Start button and, below it, a summary pill ("Starting with 100ms · point · 10s") with an edit icon. A second tab, Recent, sits next to Setup.
- Tapping Start launches the floating bar right away, using whatever configuration is currently set.
- Tapping the summary pill (or its edit icon) jumps you down to the detailed settings below. These same settings are also available by scrolling down the Setup screen directly.
Set Target Settings
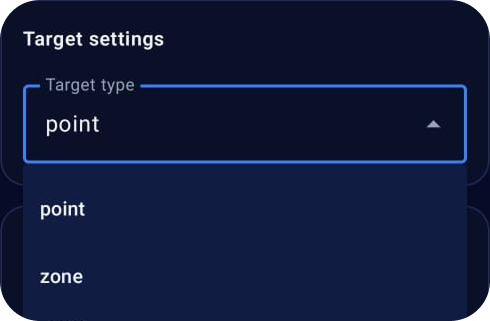
Target Type: dropdown, default point. Options: point (single fixed spot), zone (random position within a drawn area)
Set Timing & Stop
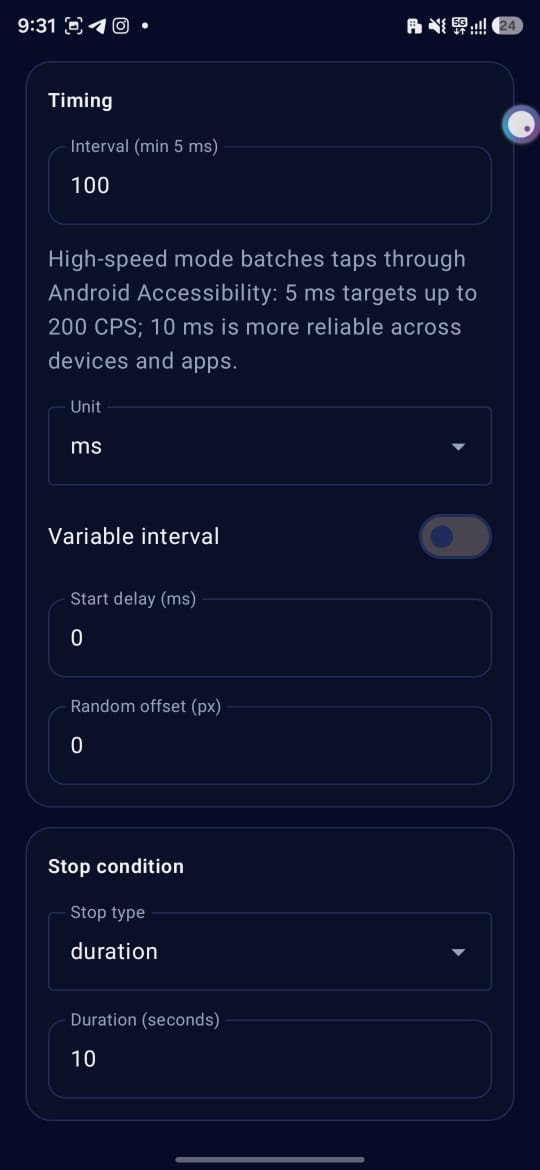
Interval: number field, minimum 5ms, default 100ms. Choose a unit from the dropdown (ms, s, min).
Stop Condition: dropdown, default duration. Options:
Never
clicking continues until stopped manually.
Cycles
enter the number of clicks in the count field.
Duration
set how long clicking should run, in the Duration (seconds) field, default 10s.
Fine-Tune with Variable Interval (Optional)
Variable interval: toggle, off by default. When turned on, two fields appear:
Start delay (ms): default 0, a wait before clicking begins.
Random offset (px): default 0, adds slight position variation to each click.

Tap Start
Tap Start. The floating control bar opens on the screen.
Placing your target and starting the clicks
Tap +: sets your target first. If target type is point, this places a single click marker at the tapped spot. If target type is zone, an on-screen prompt reads "Drag to draw a click zone." Drag to draw the area. Taps will land at random points inside it.
Tap Play: on the control bar to begin clicking. Once Play is tapped, the floating bar automatically collapses to a shorter view showing a status dot, Pause, and Stop.
The rest of the control bar buttons
Save icon: saves the current configuration as a preset.
Eye icon: shows the target you selected.
Center icon (MT Auto Clicker logo): returns to the app.
Minus icon: removes the placed target.
Gear icon: opens a "Single Target Settings" modal, letting you change Stop condition, Duration (seconds), Click interval, Target type, Start delay (ms), and Random offset (px) without closing the floating bar. Cancel or Save to apply.
X: closes the bar and stops the automation.
Save as Preset
After a run, check the Recent tab to find your last run listed with a timestamp. Tap Save to keep the setup under Presets. This removes it from Recent and opens a Save to Presets dialog with an editable preset name field, prefilled with a default name.
Feature 2 of 5
Multi Target Clicking
Multi Target Clicking places several numbered targets and clicks them in sequence or all at once, from the floating bar.
Open Multi Target
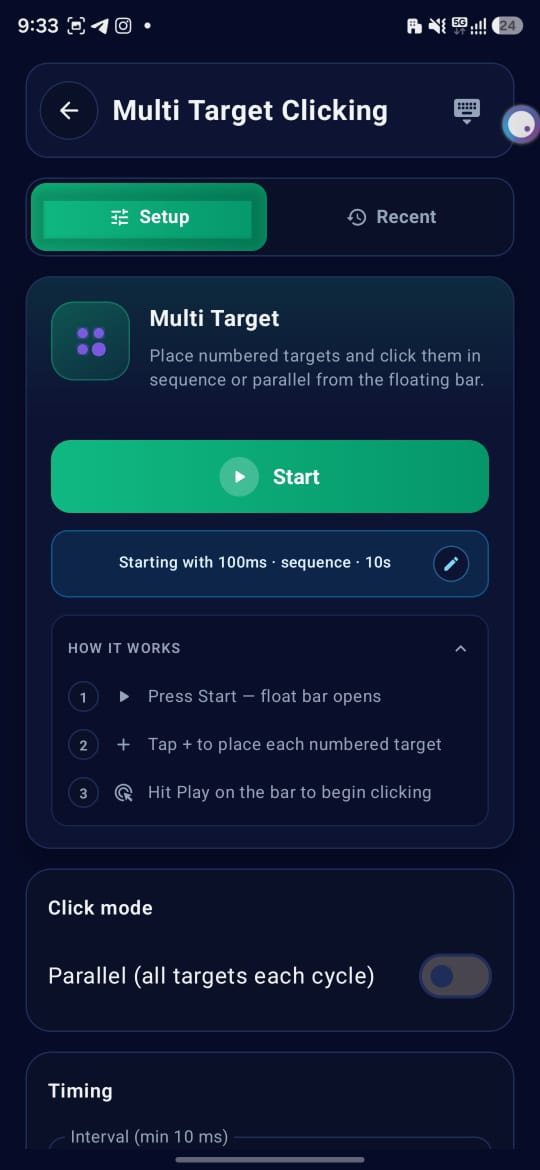
Select Multi Target from the Home screen. The Setup tab shows a Start button and, below it, a summary pill (“Starting with 100ms · parallel · 10s” or “…sequence…10s”) with an edit icon. A second tab, Recent, sits next to Setup.
- Tapping Start launches the floating bar right away, using whatever configuration is currently set.
- Tapping the summary pill (or its edit icon) jumps you down to the detailed settings below. These same settings are also available by scrolling down the Setup screen directly.
Set Click Mode
Parallel (all targets each cycle): toggle. On: all placed targets click together each cycle. Off: targets click one after another, in the order they were placed (sequence).
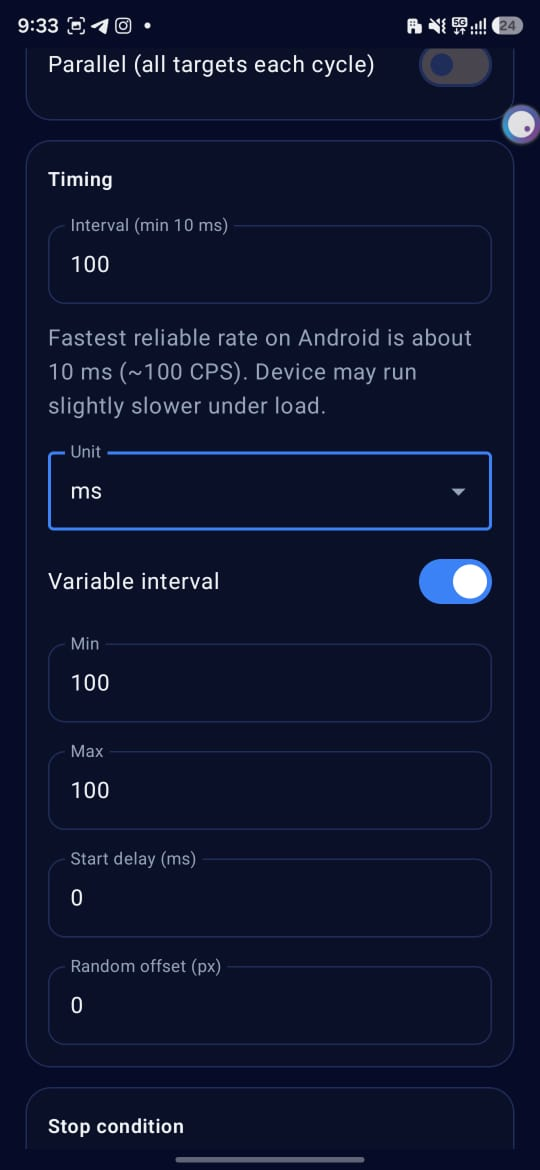
Set Timing & Stop
Interval: number field, minimum 10ms, default 100ms. Choose a unit from the dropdown (ms, s, min).
Stop Condition: dropdown, default duration. Options:
Never
clicking continues until stopped manually.
Cycles
enter the number of clicks in the count field.
Duration
set how long clicking should run, in the Duration (seconds) field, default 10s.
Fine-Tune with Variable Interval (Optional)
Variable interval: toggle, off by default. When turned on, Min and Max fields appear, setting a randomized interval range instead of a fixed interval.
Start delay (ms) and Random offset (px) fields are visible regardless of the toggle, both default 0.
Start delay: a wait before clicking begins.
Random offset: adds slight position variation to each click.

Tap Start
Tap Start. The floating control bar opens on the screen.
Placing targets and starting the clicks
Tap +: to place each numbered target. Repeat to add more targets.
Tap Play: on the control bar to begin clicking. Once Play is tapped, the floating bar automatically collapses to a shorter view showing a status dot, Pause, and Stop.
The rest of the control bar buttons
Save icon: saves the current configuration as a preset.
Eye icon: shows the targets you placed.
Center icon (MT Auto Clicker logo): returns to the app.
Minus icon: removes the last placed target.
Gear icon: opens a “Multi Target Settings” modal, letting you change Stop condition, Duration (seconds), Click interval, Parallel clicks, Start delay (ms), and Random offset (px) without closing the floating bar. Cancel or Save to apply.
X: closes the bar and stops the automation.
Save as Preset
After a run, check the Recent tab to find your last run listed with a timestamp. If no runs exist yet, the Recent tab shows a prompt to “Go to Setup.” Tap Save on a recent run to keep the setup under Presets. This removes it from Recent and opens a Save to Presets dialog with an editable preset name field, prefilled with a default name.
Feature 3 of 5
Macro Recorder
Macro Recorder captures taps, holds, and swipes as you perform them on your device, then plays them back on demand.
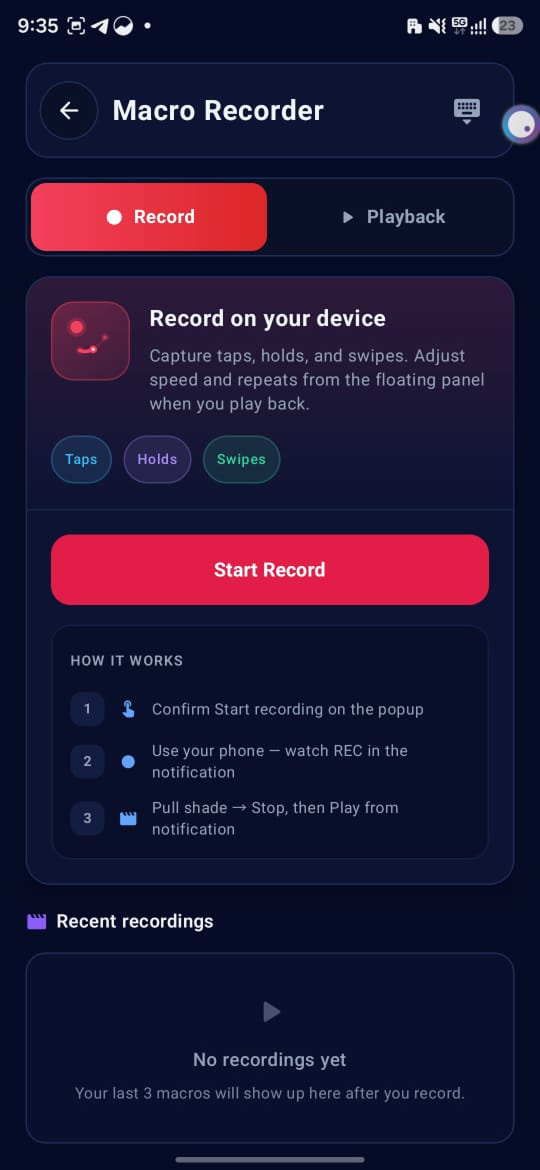
Open Macro Recorder
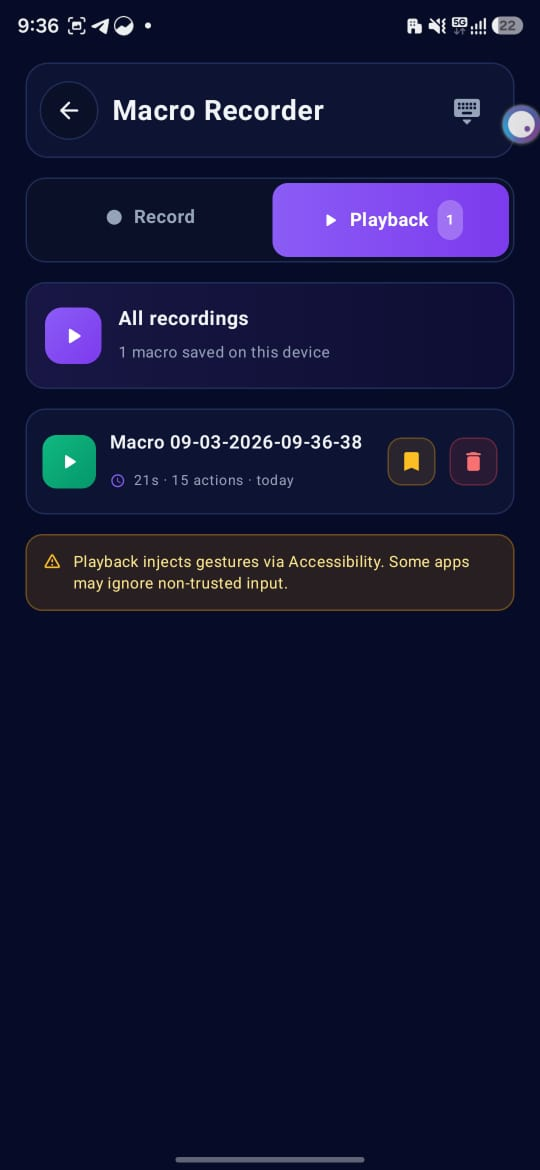
Select Macro Recorder from the Home screen. Two tabs sit at the top: Record and Playback. The Playback tab shows a count badge once at least one macro has been saved.
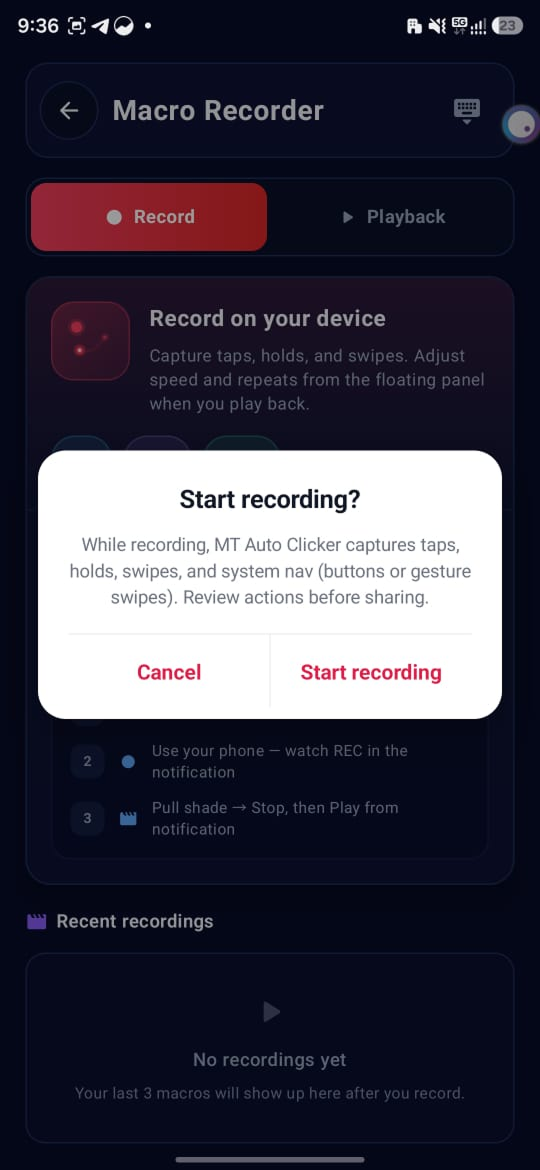
Start Recording
On the Record tab, review the three action types this feature captures: Taps, Holds, Swipes.
- Tap Start Record.
- A confirmation popup appears: “Start recording? While recording, MT Auto Clicker captures taps, holds, swipes, and system nav (buttons or gesture swipes). Review actions before sharing.” Tap Start recording to confirm, or Cancel.
Record Your Actions
Once confirmed, a persistent notification shows a live timer and action count (“Recording… 00:03 · 3 actions”), along with a Stop button and Back / Home / Recents shortcuts.
- Use your phone normally. Every tap, hold, and swipe is captured.
- To finish, pull down the notification shade and tap Stop on the recording notification.
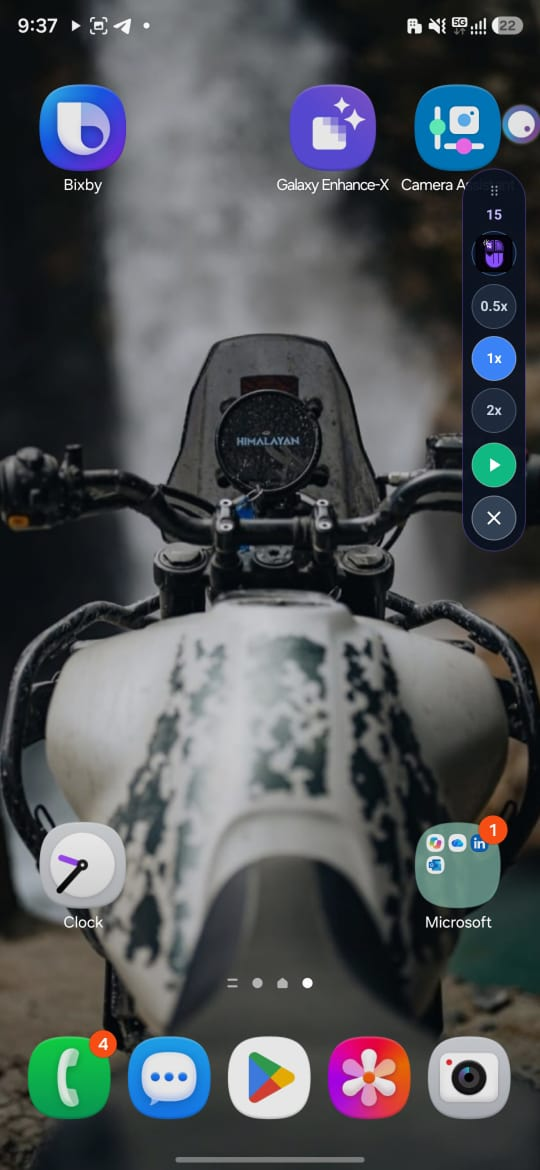
Review and Play Back
After stopping, the macro appears under Recent recordings on the Record tab, showing its name (auto-named with date and time), duration, action count, and date.
- Recent recordings shows only the last 3 macros. Tap “Open playback library →” to jump to the Playback tab and see the complete saved list under All recordings.
- Tap the Play icon next to a macro to play it back. A floating bar opens with playback controls: a count field (default 15), setting how many times the macro repeats; Speed options: 0.5x, 1x, 2x; Play, to begin playback; X, to close the bar.
- Tap the Bookmark icon to save the macro as a preset by tapping Save preset.
- Tap the Delete icon to remove the macro.
Understand Recording Limits
Tap “Show” on the Recording limits & notes section to expand details on what the feature can and cannot capture.
Device limitations:
- Playback injects gestures via Accessibility, so your finger does not move during playback.
- Some apps ignore injected (non-trusted) gestures.
- Accessibility must stay enabled for both recording and playback.
- After updating the app, toggle Accessibility off then on so nav-key capture keeps working.
- Gesture navigation mapping: left/right edge swipe is Back, bottom swipe up is Home, hold is Recents, top swipe down is Notifications.
- If your device’s OEM blocks the Home or Recents keys, use the Back / Home / Recents shortcuts on the recording notification instead.
- Macros are stored on this device only.
What is recorded: taps (single click), long presses (holds), swipes and drag paths, Back / Home / Recents gestures (edge or bottom gestures, 3-button bar, or notification actions), notification shade swipe from the top edge, delays between each action.
What is not recorded: keyboard typing (except captured text fields), touches the OS reserves for system edges, notifications and most OS dialogs (except the shade swipe), multi-finger or pinch gestures.
Play Back Anytime
From the Playback tab, All recordings shows every saved macro with its play, bookmark, and delete controls, along with the total count (“1 macro saved on this device”). If no macros exist yet, this tab shows “No macro recordings yet” with a “Go to Record” button.
Feature 4 of 5
Full Page Screenshot
Full Page Screenshot captures an entire scrollable screen, like a chat, feed, or long page, by scrolling and stitching multiple captures together.
Open Full Page Screenshot
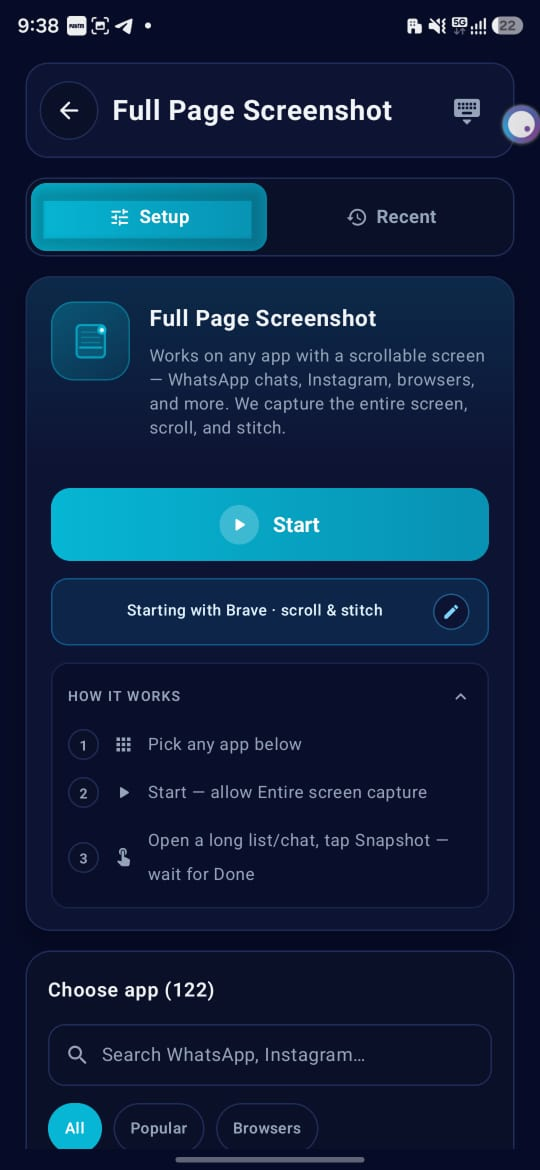
Select Full Page Screenshot from the Home screen. The Setup tab shows a Start button and, below it, a summary pill (e.g. “Starting with Brave · scroll & stitch”) with an edit icon. A second tab, Recent, sits next to Setup.
Choose an App
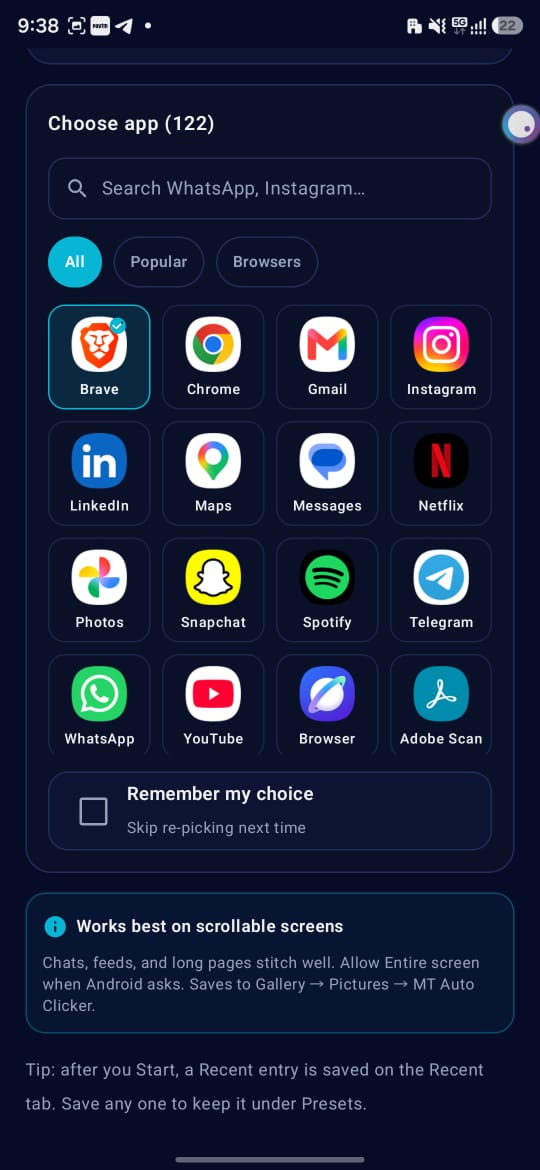
- Use the search bar to find an app, or browse the grid under filter chips: All, Popular, Browsers. 122 apps are supported.
- Tap “Remember my choice” to skip re-picking the app next time.
Tap Start
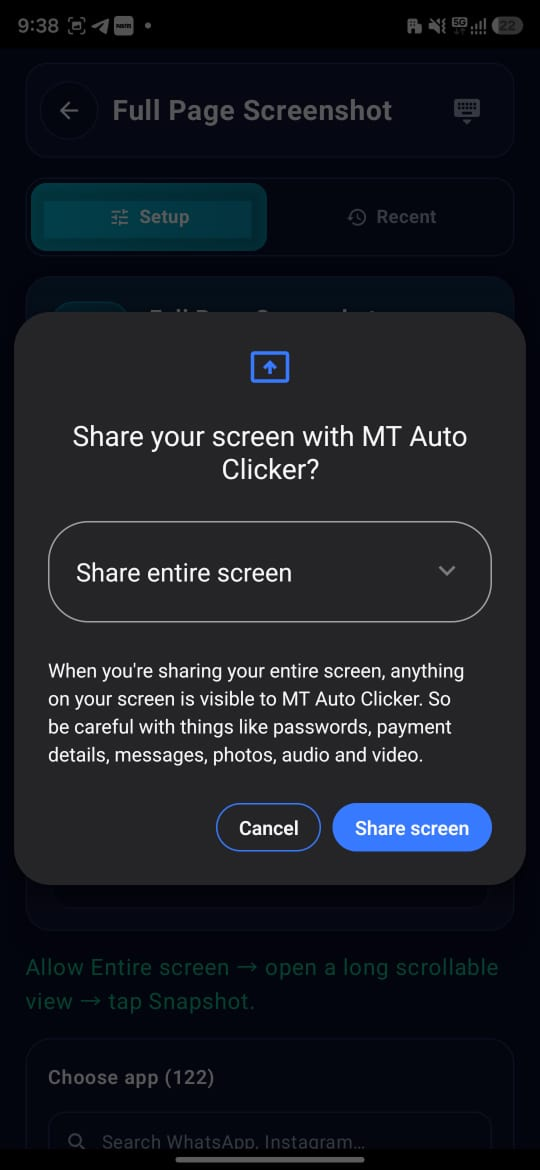
Tap Start. Android asks to share your screen with MT Auto Clicker.
- A system dialog appears: “Share your screen with MT Auto Clicker?” with a dropdown defaulted to Share entire screen, and a privacy warning that anything on screen becomes visible to the app while sharing.
- Tap Share screen to allow entire screen capture, or Cancel.
Capture the Screen
Once sharing starts, a small floating bar appears on top of the app you’re capturing, showing:
Shot (camera icon): tap to take a capture.
Center icon (MT Auto Clicker logo): returns to the app.
X: closes the floating bar and ends the session.
Open the long list or chat you want to capture, then tap Shot. A system indicator shows “Capturing · [count]” as each capture is taken. Captures save automatically, no manual confirm step needed.
Find Your Screenshot
Captured images stitch together and save to Gallery → Pictures → MT Auto Clicker.
Save as Preset
After a run, check the Recent tab to find your last run listed with the target app name and timestamp. Tap Save to keep the setup under Presets. This removes it from Recent and opens a Save to Presets dialog with an editable preset name field, prefilled with a default name.
Feature 5 of 5
Auto Refresh
Auto Refresh pulls to refresh any app on a timer, useful for browsers, feeds, game lobbies, and similar refreshing screens.
Open Auto Refresh
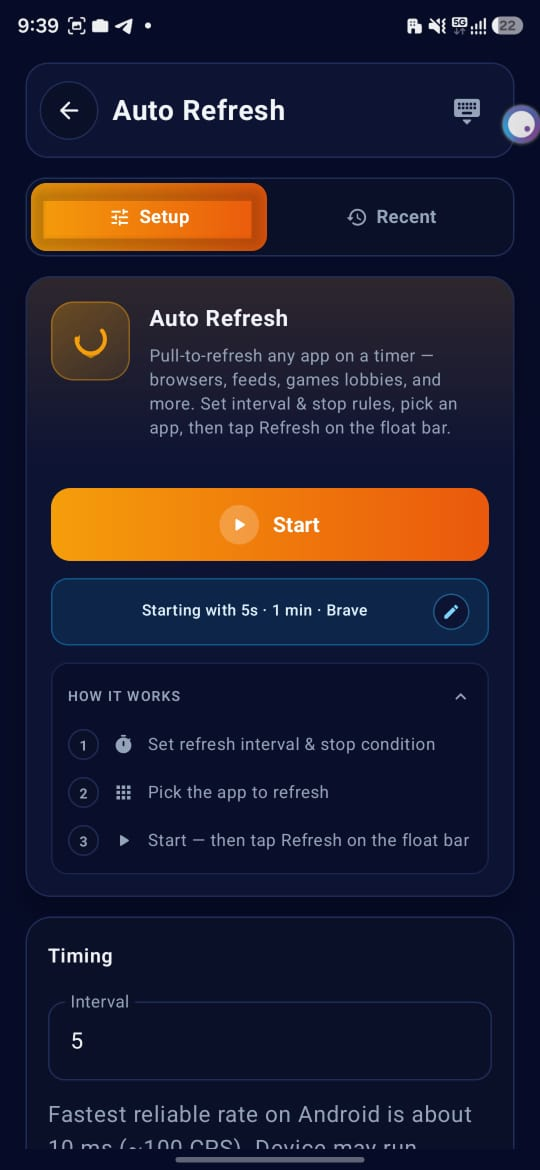
Select Auto Refresh from the Home screen. The Setup tab shows a Start button and, below it, a summary pill (e.g. “Starting with 5s · 1 min · Brave”) with an edit icon. A second tab, Recent, sits next to Setup.
Set Timing & Stop
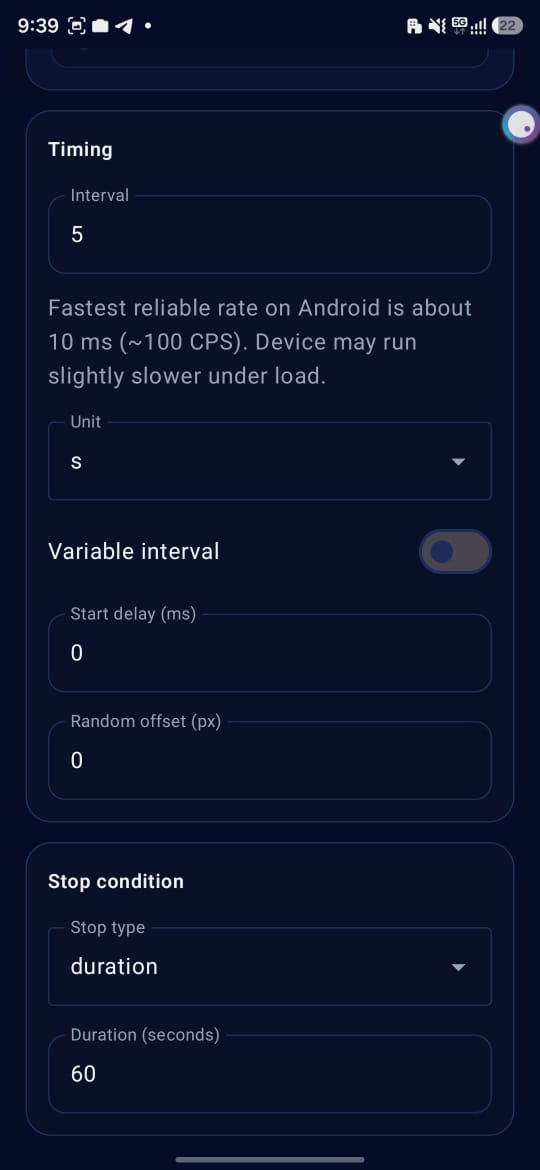
Interval: number field, default 5. Choose a unit from the dropdown (ms, s, min).
Variable interval: toggle, off by default. When turned on, Min and Max fields appear, setting a randomized interval range instead of a fixed interval. Start delay (ms) and Random offset (px) fields are visible regardless of the toggle, both default 0.
Never
refreshing continues until stopped manually.
Cycles
enter the number of refreshes in the count field.
Duration
set how long refreshing should run, in the Duration (seconds) field, default 60.
Choose an App
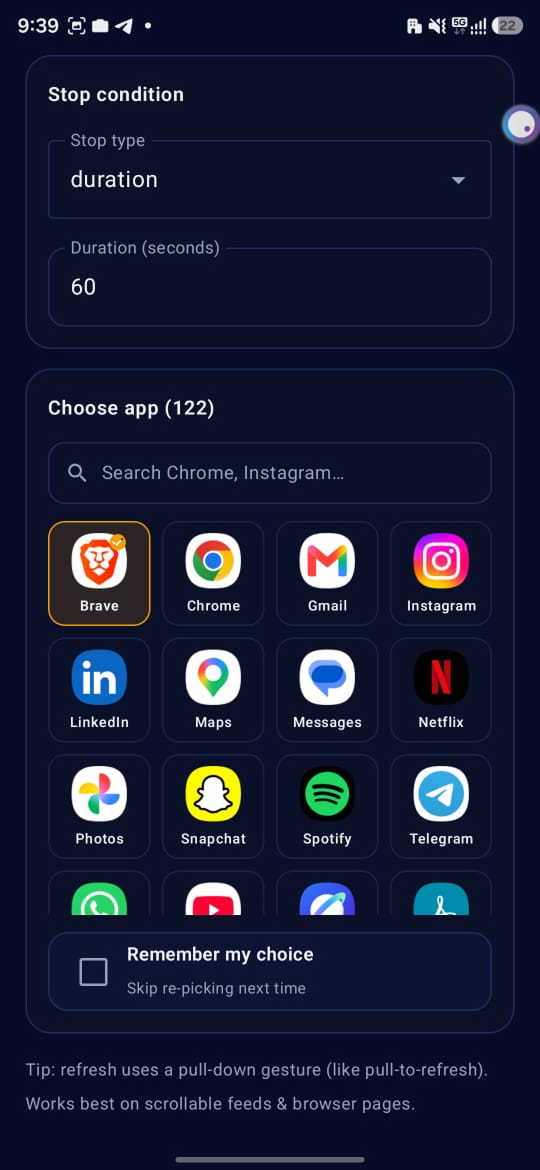
- Use the search bar to find an app, or browse the grid under filter chips: All, Popular, Browsers. 122 apps are supported.
- Tap “Remember my choice” to skip re-picking the app next time.
Tap Start
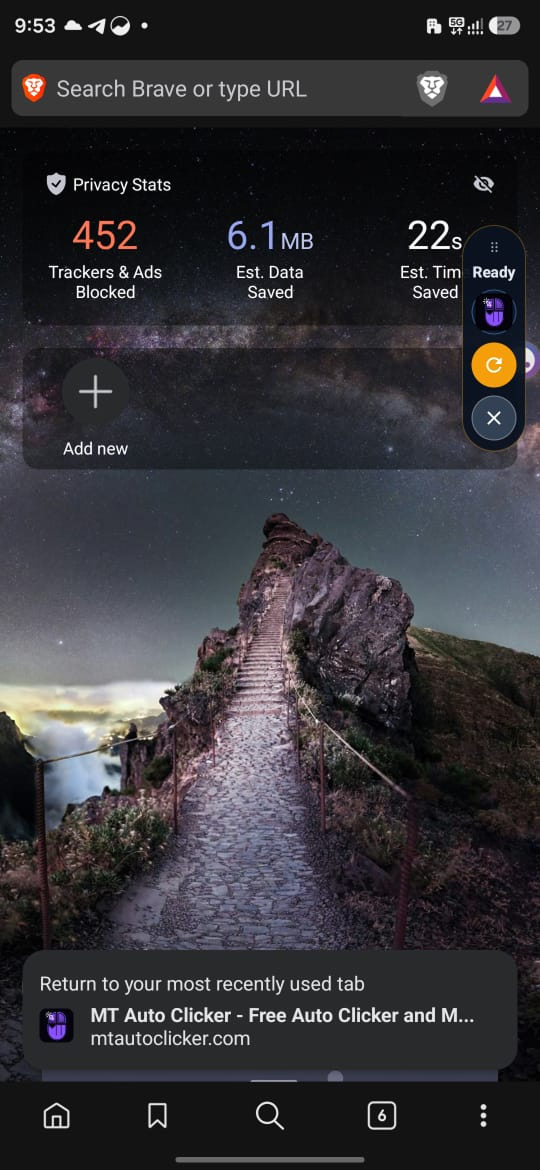
Tap Start. The floating control bar opens on screen, showing a “Ready” label, the MT Auto Clicker logo, a Refresh icon, and X.
- Tap the Refresh icon to begin. The bar collapses to a shorter view showing a live count, Pause, and Stop.
- Tap Pause to pause refreshing, or Stop to end the run.
Save as Preset
After a run, check the Recent tab to find your last run listed with the app name and duration (e.g. “Recent · Brave · 5s”). Tap Save to keep the setup under Presets. This removes it from Recent and opens a Save to Presets dialog with an editable preset name field, prefilled with a default name.